
Appearance
Auto Backup Plugin Configuration
This guide explains how to configure the Auto Backup Plugin in GoBiz, connect external cloud storage providers, generate the required API credentials and configure automatic backup schedules.
The plugin allows administrators to store website files and database backups in external storage services and backups will be uploaded to connected storage provider.
1. Access the Auto Backup Configuration
Before configuring the storage providers, make sure the Auto Backup Plugin is installed.
Follow these steps:
- Log in to your GoBiz Admin Panel.
- Navigate to Plugins.
- Locate Auto Backup.
- Click Open.
- Select the Storage tab.
The Storage section displays the available cloud storage providers.
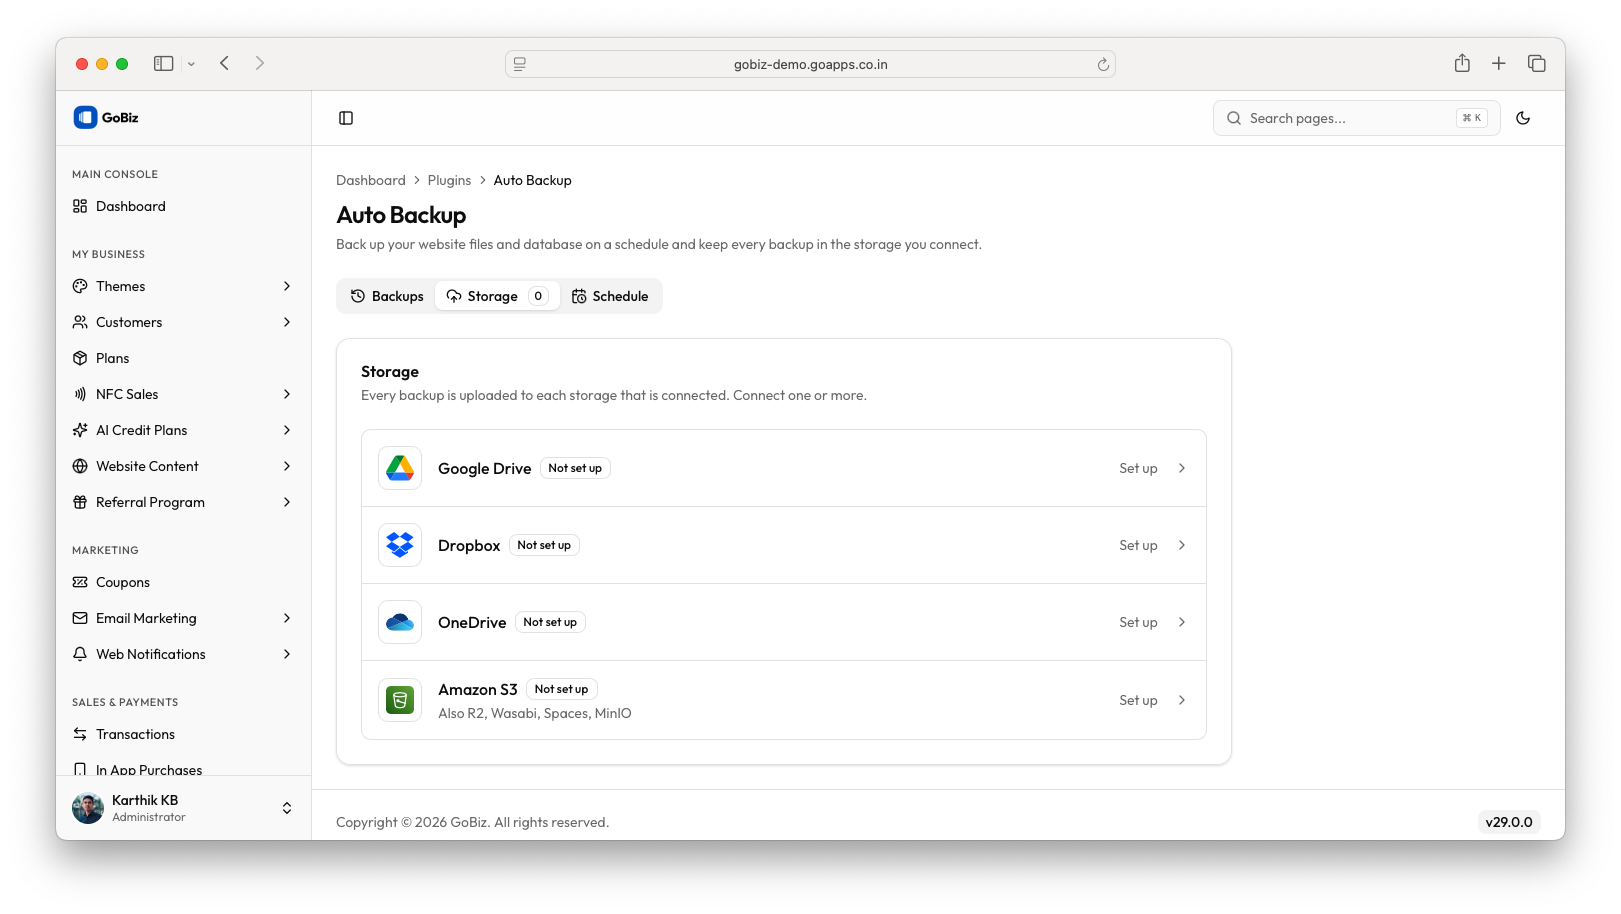
Available Storage Providers
The following storage providers are available:
- Google Drive
- Dropbox
- OneDrive
- Amazon S3 and compatible storage services.
Every backup is uploaded to each connected storage provider. You can connect one or multiple storage providers depending on your backup requirements.
2. Google Drive Configuration
Google Drive allows you to store website and database backups directly in your Google Drive account.
To connect Google Drive, you need to create a Google Cloud project, enable the Google Drive API and generate OAuth credentials.
Step 1: Open Google Cloud Console
- Visit Google Cloud Console.
- Sign in using your Google account.
- Create a new project or select an existing project.
- Give your project a meaningful name, such as
GoBiz Auto Backup.
Step 2: Enable Google Drive API
The Google Drive API allows GoBiz to communicate with your Google Drive account.
- Open the Google Drive API Library.
- Select the Google Cloud project created in the previous step.
- Locate the Google Drive API.
- Click Enable.
- Wait until the API is enabled successfully.
Step 3: Configure the OAuth Consent Screen
OAuth consent screen configuration is required to allow users to authorize GoBiz to access their Google Drive.
- Open Google Auth Platform.
- Open the Branding section.
- Configure the application information:
- App name: GoBiz Auto Backup
- User support email: Your support email address
- Developer contact email: Your developer email address.
- Save the branding configuration.
- Open the Audience section.
- Select the appropriate audience for your application.
Important: If the application is configured as External and remains in Testing mode, add the Google account that will authorize the integration under Test users.
If the application is intended for general production use, complete the applicable publishing and verification requirements.
Step 4: Create OAuth Client ID
OAuth Client ID identifies your application when it communicates with Google's authentication services.
Open the Clients section in Google Auth Platform.
Click Create Client.
Select Web application as the application type.
Enter a name, such as
GoBiz Auto Backup.Locate the Authorized redirect URIs section.
Open the GoBiz Admin Panel in another tab.
Navigate to:
Plugins → Auto Backup → Storage → Google Drive → Set upCopy the Authorised redirect URI displayed in the Google Drive configuration window.
Return to Google Cloud Console.
Paste the copied URI into the Authorized redirect URIs field.
Click Create.
Important: Always copy the redirect URI directly from the GoBiz configuration window.
Step 5: Obtain Client ID and Client Secret
After creating the OAuth client, Google will generate the following credentials:
Client ID
- Identifies your registered application.
- Used by GoBiz to initiate OAuth authentication.
- Available under Google Auth Platform → Clients → Your application.
Client Secret
- Authenticates your application during the OAuth token exchange.
- Generated when the OAuth client is created.
- Copy and securely store the secret when it is displayed.
Do not share the client secret publicly.
Step 6: Configure Google Drive in GoBiz
Return to the GoBiz Admin Panel.
Navigate to:
Plugins → Auto Backup → Storage → Google Drive
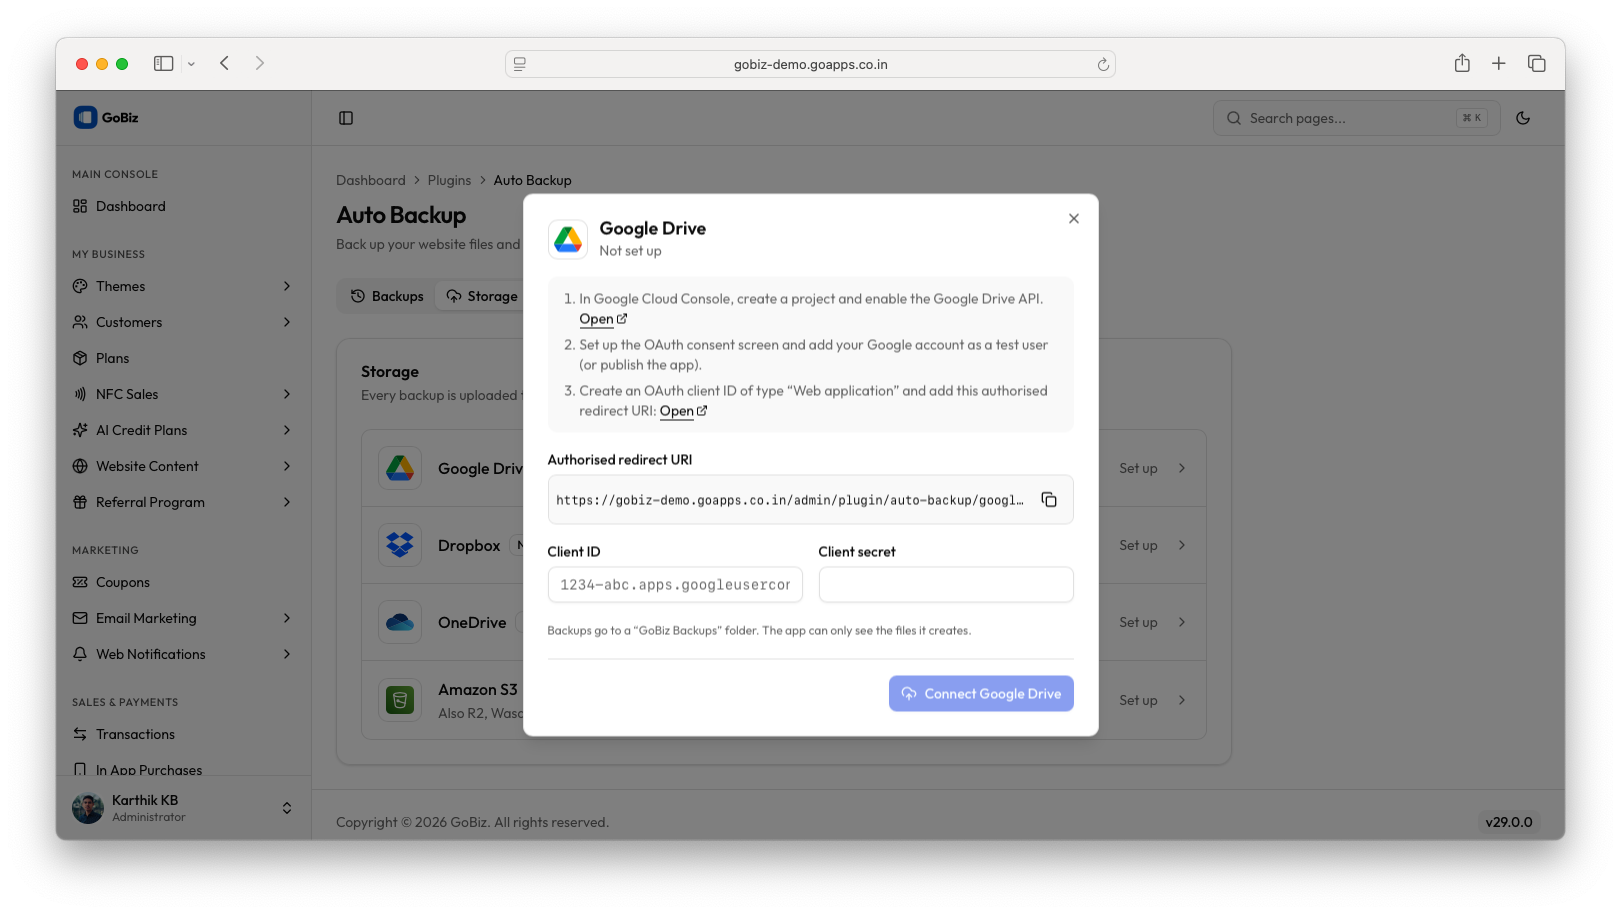
Enter the following information:
| Field | Description |
|---|---|
| Authorised redirect URI | Automatically generated by GoBiz. Copy this into Google Cloud Console. |
| Client ID | OAuth Client ID generated from Google Cloud Console. |
| Client Secret | OAuth Client Secret generated from Google Cloud Console. |
- Paste the Client ID.
- Paste the Client Secret.
- Verify both credentials.
- Click Connect Google Drive.
- Complete the Google authorization process if prompted.
- Select the Google account you want to use.
- Grant the requested permissions.
Google Drive Storage Folder
After successful authorization, GoBiz automatically creates a folder named:
GoBiz Backups
All Google Drive backups are stored inside this folder.
The application manages the folder automatically, so you do not need to create it manually.
3. Dropbox Configuration
Dropbox allows you to store website and database backups in your Dropbox account.
To connect Dropbox, you need to create a Dropbox application and generate an App Key and App Secret.
Step 1: Open Dropbox App Console
- Visit the Dropbox App Console.
- Sign in using your Dropbox account.
- Click Create app.
- Select Scoped access as the API type.
- Select App folder as the access type.
- Enter an application name, such as
GoBiz Auto Backup. - Click Create app.
What is App Folder access?
App Folder access restricts the application's access to its own dedicated folder inside Dropbox.
This means the application can manage its backup files without requiring access to your entire Dropbox account.
Step 2: Configure Dropbox Permissions
After creating the application:
- Open the Permissions tab.
- Enable the required permissions.
The permissions shown in the GoBiz setup instructions include:
| Permission | Purpose |
|---|---|
account_info.read | Allows the application to retrieve basic Dropbox account information. |
files.content.write | Allows the application to upload and modify backup files. |
If the application also needs to list, inspect or download stored backup files, enable the corresponding read permissions, such as files.metadata.read and files.content.read, where required by the integration.
- Click Submit or Save changes to apply the permissions.
Important: Permissions must be saved before connecting Dropbox. Otherwise, the application may not have the required access to upload backup files.
Step 3: Configure the Redirect URI
The Redirect URI is the address to which Dropbox returns the user after successful authorization.
Open the GoBiz Admin Panel.
Navigate to:
Plugins → Auto Backup → Storage → DropboxCopy the Redirect URI displayed in the configuration window.
Return to the Dropbox App Console.
Open your application.
Navigate to the Settings tab.
Locate the OAuth 2 section.
Add the copied GoBiz Redirect URI to the Redirect URIs field.
Save the changes.
Step 4: Obtain App Key and App Secret
Dropbox generates two credentials for every application.
App Key
- Uniquely identifies your Dropbox application.
- Used by GoBiz to identify the registered application.
- Available under the Dropbox App Console → Your App → Settings → App Key.
App Secret
- Used to authenticate your application during the OAuth authorization process.
- Available under the same application settings.
- Click Show if the secret is hidden and copy the value.
Keep the App Secret confidential.
Step 5: Configure Dropbox in GoBiz
Return to the GoBiz Admin Panel.
Navigate to:
Plugins → Auto Backup → Storage → Dropbox
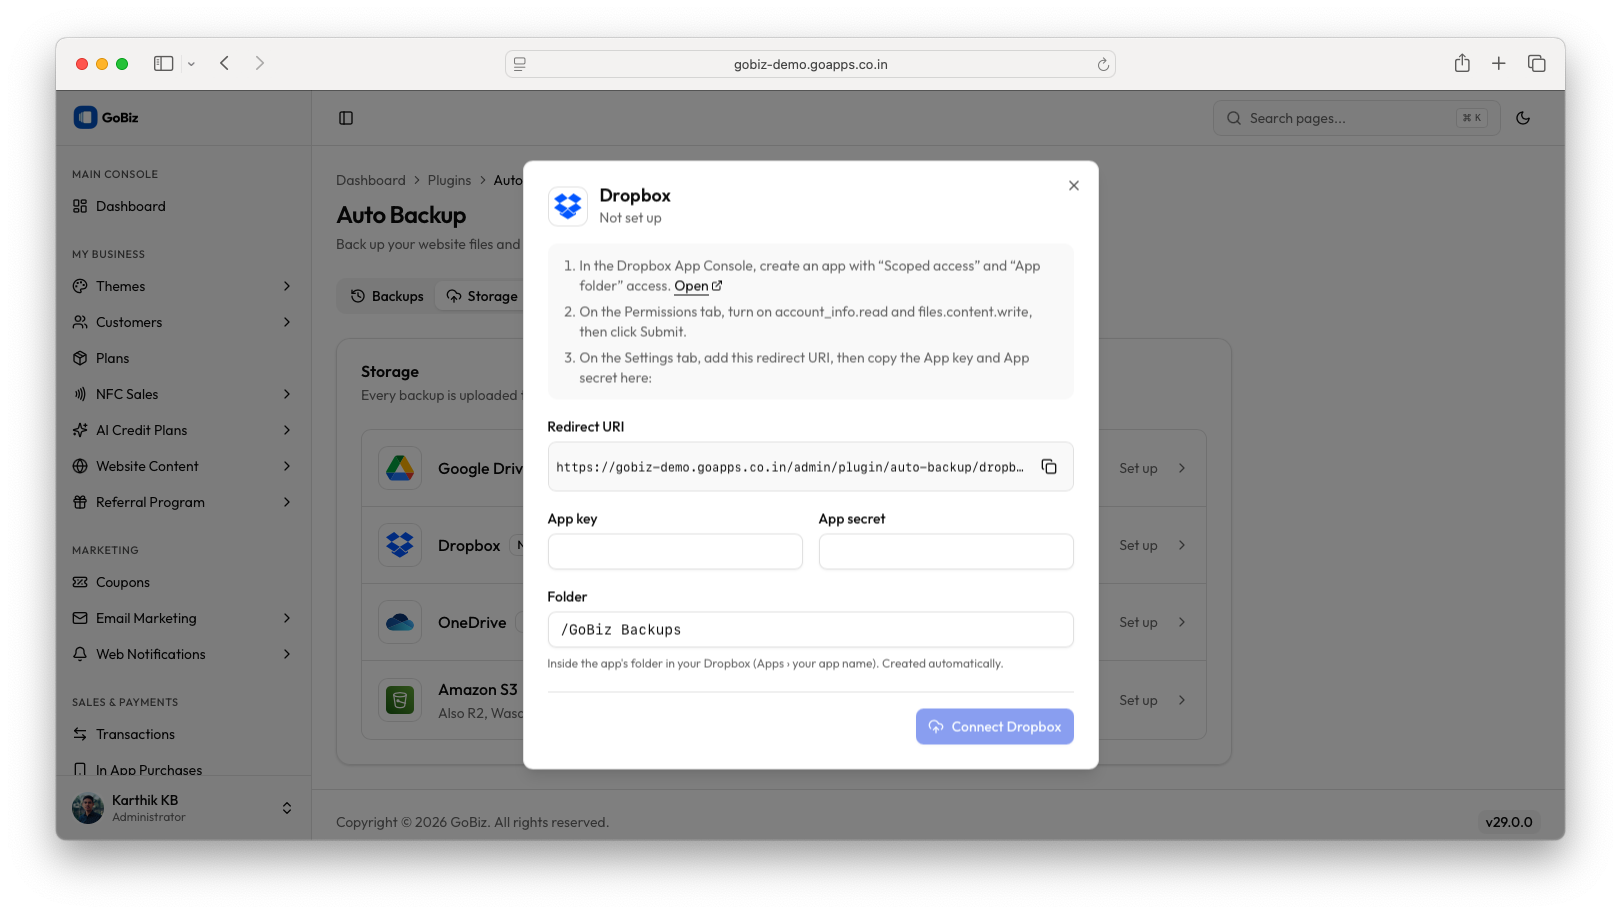
Enter the following details:
| Field | Description |
|---|---|
| Redirect URI | Automatically generated by GoBiz. Register this URI in Dropbox. |
| App Key | Application key generated from Dropbox App Console. |
| App Secret | Application secret generated from Dropbox App Console. |
| Folder | Name of the folder where backups will be stored. Default: GoBiz Backups. |
- Enter the App Key.
- Enter the App Secret.
- Verify the Folder name.
- Click Connect Dropbox.
- Complete the Dropbox authorization process if prompted.
Dropbox Storage Folder
The default backup folder is:
GoBiz Backups
The folder is created automatically inside the application's dedicated Dropbox App folder.
The resulting location will be similar to:
Apps/GoBiz Auto Backup/GoBiz Backups
The exact application folder name depends on the name selected when creating the Dropbox application.
4. OneDrive Configuration
Microsoft OneDrive allows you to store website and database backups in your Microsoft account.
To connect OneDrive, you need to register an application in Microsoft Entra ID and generate an Application (client) ID and Client Secret.
Step 1: Open Microsoft Azure Portal
Visit the Microsoft Azure Portal.
Sign in using your Microsoft account.
Open Microsoft Entra ID.
Navigate to:
Microsoft Entra ID → App registrationsClick New registration.
Step 2: Register a New Application
Enter the following information:
| Field | Description |
|---|---|
| Name | Application name, such as GoBiz Auto Backup. |
| Supported account types | Select the account types supported by the GoBiz integration. |
| Redirect URI | Add the redirect URI provided by GoBiz. |
Supported account types
Microsoft provides different account types:
- Accounts in this organizational directory only.
- Accounts in any organizational directory.
- Accounts in any organizational directory and personal Microsoft accounts.
- Personal Microsoft accounts only.
Choose the option that supports the intended OneDrive accounts.
For example, if you need both personal Microsoft accounts and organizational accounts, select the corresponding combined account type, provided it is supported by the GoBiz integration.
Click Register to create the application.
Step 3: Configure the Redirect URI
After registering the application:
Open the newly created application.
Navigate to Authentication.
Click Add a platform.
Select Web.
Open the GoBiz Admin Panel.
Navigate to:
Plugins → Auto Backup → Storage → OneDriveCopy the Redirect URI displayed in the configuration window.
Return to Microsoft Entra ID.
Paste the copied URI into the Redirect URI field.
Click Configure or Save.
Important: Select the Web platform for this server-side OAuth integration. Use the exact redirect URI supplied by GoBiz.
Step 4: Configure API Permissions
The application needs permission to access the user's OneDrive files.
- Open API permissions.
- Select Add a permission.
- Select Microsoft Graph.
- Choose the permission type required by the integration.
- Add the required delegated permissions.
For an integration that accesses files on behalf of a signed-in user, typical Microsoft Graph delegated permissions include:
| Permission | Purpose |
|---|---|
Files.ReadWrite | Allows the application to read, create, update and delete files accessible to the signed-in user. |
offline_access | Allows the application to receive refresh tokens for continued access. |
Grant additional permissions only if required by the integration.
If administrator consent is required by the Microsoft tenant, an administrator must approve the requested permissions.
Important: The permissions available to the application depend on its account type and Microsoft tenant configuration.
Step 5: Generate Client Secret
The Client Secret is used to authenticate your application with Microsoft identity services.
- Open the application registration.
- Navigate to Certificates & secrets.
- Select the Client secrets tab.
- Click New client secret.
- Enter a description, such as
GoBiz Auto Backup. - Select the required expiration period.
- Click Add.
Microsoft will generate a Client Secret.
Copy the Value immediately.
Important: Copy the Value, The Value is the actual credential required by GoBiz. Microsoft displays it only when the secret is created.
Step 6: Obtain Application (Client) ID
The Application (client) ID uniquely identifies your registered application.
To find it:
- Open your application registration.
- Navigate to Overview.
- Locate Application (client) ID.
- Copy the ID.
Do not confuse the Application (client) ID with the Directory (tenant) ID.
Step 7: Configure OneDrive in GoBiz
Go to the GoBiz Admin Panel.
Navigate to:
Plugins → Auto Backup → Storage → OneDrive
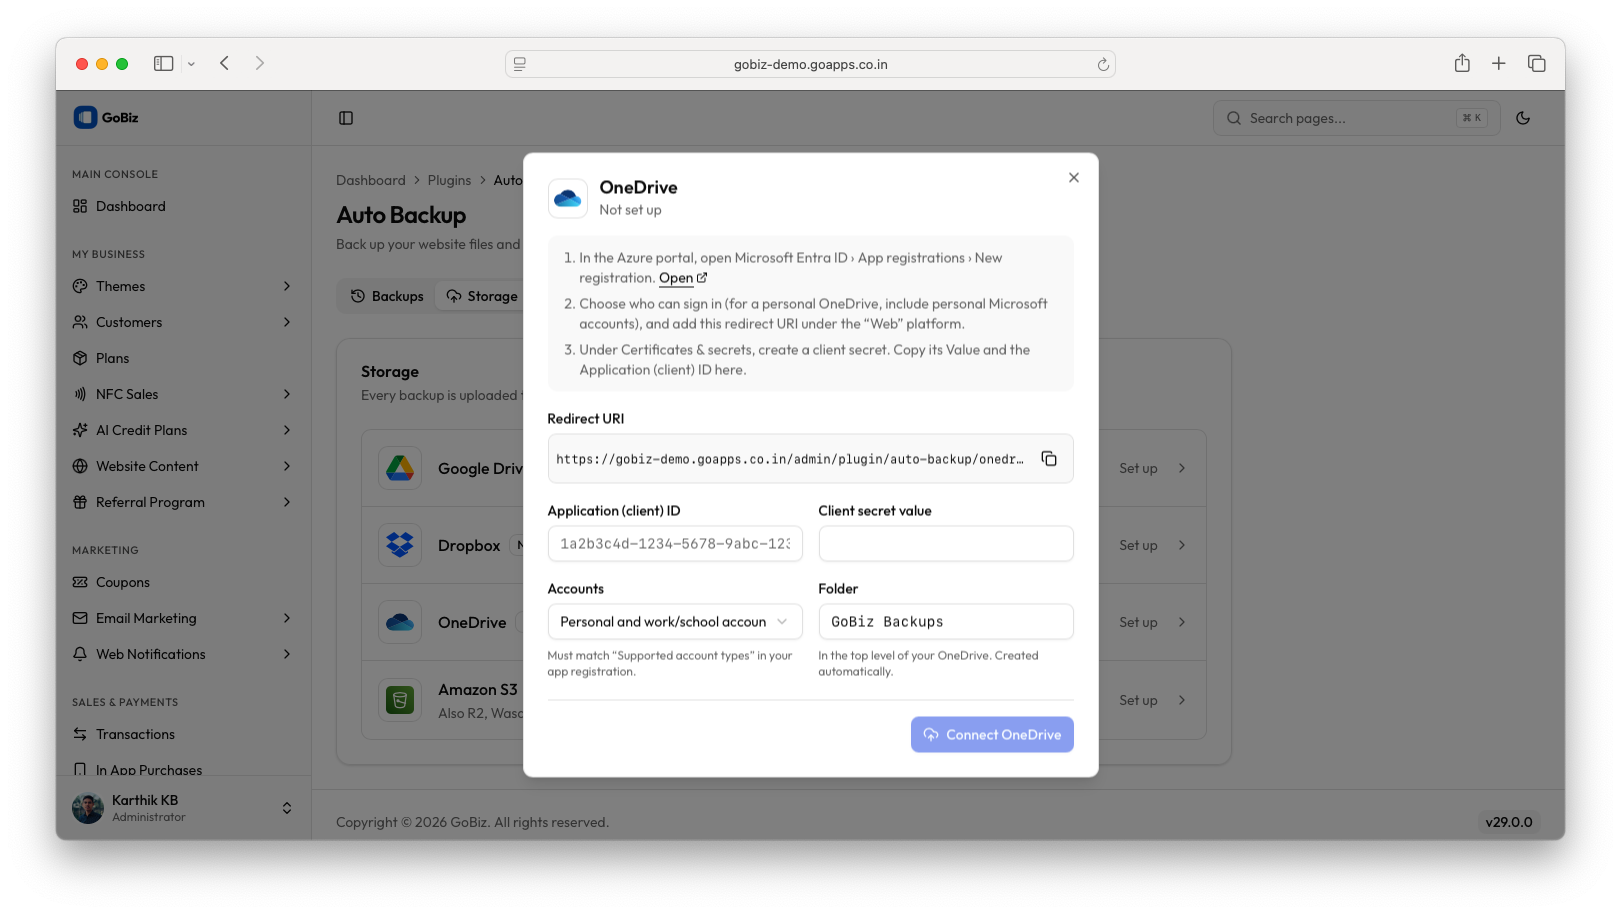
Enter the following details:
| Field | Description |
|---|---|
| Redirect URI | Automatically generated by GoBiz. Register this URI in Microsoft Entra ID. |
| Application (client) ID | Application ID generated during Microsoft Entra registration. |
| Client Secret Value | Client Secret Value generated under Certificates & secrets. |
| Accounts | Select the supported account type: Personal or work/school account. |
| Folder | Name of the folder where backups will be stored. Default: GoBiz Backups. |
- Enter the Application (client) ID.
- Enter the Client Secret Value.
- Select the appropriate account type.
- Verify the folder name.
- Click Connect OneDrive.
- Complete the Microsoft authorization process if prompted.
OneDrive Storage Folder
The default backup folder is:
GoBiz Backups
The application automatically creates this folder at the top level of the connected OneDrive account.
All backups will be stored inside this folder.
5. Amazon S3 and S3-Compatible Storage Configuration
Amazon S3 is an object storage service that allows applications to store and retrieve files using buckets.
Step 1: Create an S3 Bucket
For Amazon S3:
- Visit the AWS Management Console.
- Sign in to your AWS account.
- Open Amazon S3.
- Click Create bucket.
- Enter a unique bucket name.
- Select the AWS region.
- Configure the required bucket settings.
- Click Create bucket.
A bucket is a container used to organize and store backup objects.
Example bucket name:
my-gobiz-backups
Important: Bucket names must be globally unique within the AWS partition.
Step 2: Create IAM Access Credentials
To allow GoBiz to upload backups to Amazon S3, you need an IAM identity with the required S3 permissions.
- Open the AWS IAM Console.
- Navigate to Users.
- Click Create user.
- Enter a username, such as
gobiz-auto-backup. - Create the user.
- Assign the required permissions.
For production environments, grant only the permissions required to manage backup objects in the selected bucket.
Typical S3 permissions include:
| Permission | Purpose |
|---|---|
s3:PutObject | Upload backup files to the bucket. |
s3:GetObject | Read or download stored backups. |
s3:DeleteObject | Delete old backup files when required. |
s3:ListBucket | List objects stored in the bucket. |
The resource scope should be restricted to the intended bucket and its objects.
Example resource scope:
arn:aws:s3:::my-gobiz-backups
For object operations, use:
arn:aws:s3:::my-gobiz-backups/*
Configure any additional permissions required by the integration.
Step 3: Generate Access Key ID and Secret Access Key
After creating the IAM user:
- Open the IAM user.
- Navigate to Security credentials.
- Locate the Access keys section.
- Click Create access key.
- Select the appropriate use case for the application.
- Complete the access key creation process.
- Copy the generated credentials.
You will receive two credentials:
Access Key ID
- Identifies the IAM access key.
- Used to authenticate requests to S3.
- Entered into the Access Key ID field in GoBiz.
Secret Access Key
- Acts as the secret credential associated with the Access Key ID.
- Used to sign authenticated S3 requests.
- Entered into the Secret Access Key field in GoBiz.
Save the Secret Access Key securely because it cannot be retrieved again after leaving the creation screen.
Step 4: Configure Amazon S3 in GoBiz
Open the GoBiz Admin Panel.
Navigate to:
Plugins → Auto Backup → Storage → Amazon S3
The configuration window contains the following fields:
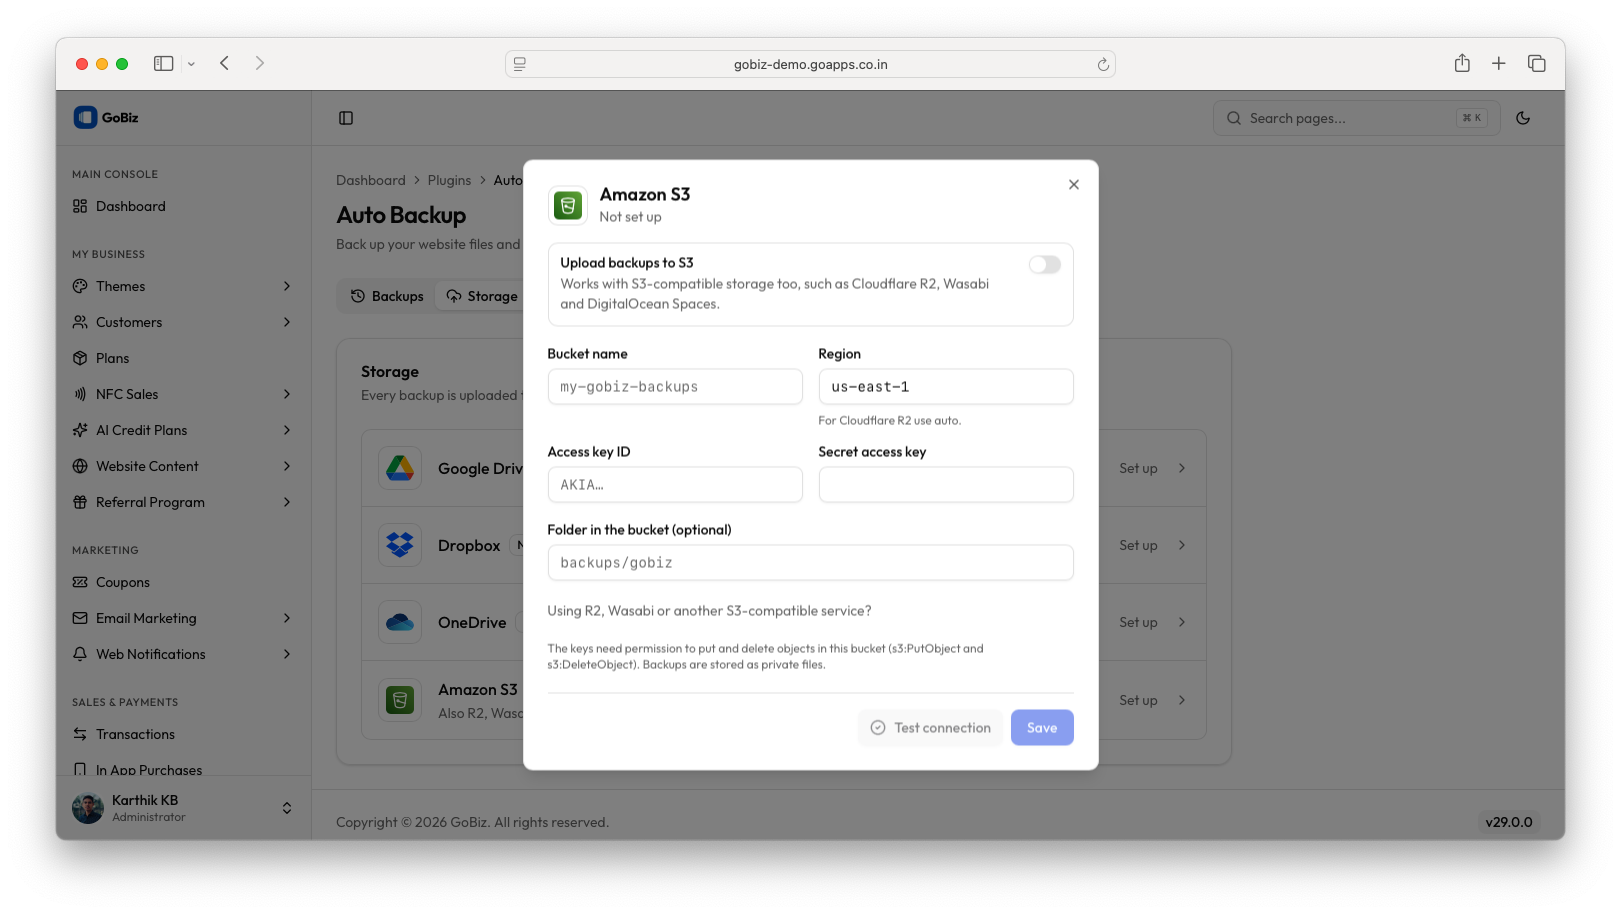
| Field | Description |
|---|---|
| Upload backups to S3 | Enable or disable backup uploads to S3-compatible storage. |
| Bucket name | Name of the bucket created in the storage provider. |
| Region | AWS region where the bucket is located. |
| Access Key ID | Access key generated from AWS IAM or the compatible provider. |
| Secret Access Key | Secret access key associated with the Access Key ID. |
| Folder in the bucket (optional) | Folder prefix inside the bucket where backup files will be stored. |
Enter the following details:
- Enable Upload backups to S3.
- Enter your bucket name.
- Select or enter the bucket region.
- Enter the Access Key ID.
- Enter the Secret Access Key.
- Enter an optional folder path.
Example configuration:
| Field | Example |
|---|---|
| Bucket name | my-gobiz-backups |
| Region | us-east-1 |
| Access Key ID | Your generated access key |
| Secret Access Key | Your generated secret key |
| Folder | backups/gobiz |
- Click Test connection.
- If the connection is successful, click Save.
6. Configure the Server Cron Job
Automatic backups require a server cron job to execute the scheduled tasks.
The cron job must be configured on your hosting server.
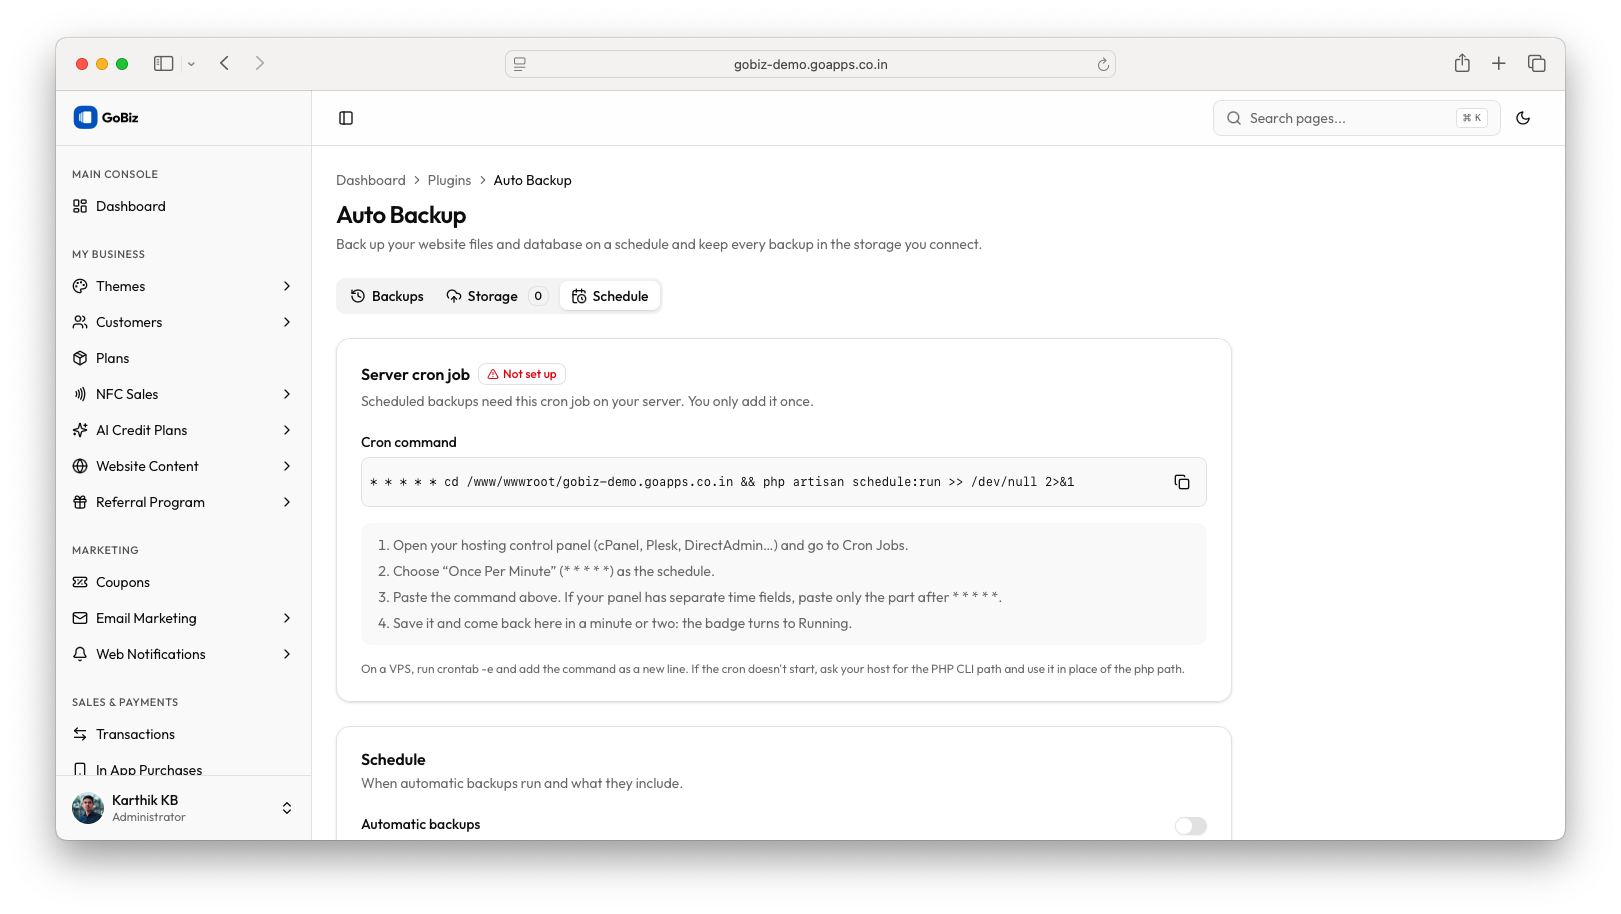
Step 1: Open the Schedule Section
- Open the Auto Backup Plugin.
- Select the Schedule tab.
- Locate the Server cron job section.
- Check the current cron job status.
The status will indicate whether the required cron job has been configured.
Step 2: Copy the Cron Command
The plugin provides a cron command that needs to be configured on your hosting server.
Example command:
bash
* * * * * cd /www/wwwroot/your-domain.com && php artisan schedule:run >> /dev/null 2>&1Important: Replace /www/wwwroot/your-domain.com with your actual GoBiz application root directory.
The command performs the following operations:
| Command | Purpose |
|---|---|
* * * * * | Executes the cron command every minute. |
cd | Changes the working directory to the GoBiz application root. |
php artisan schedule:run | Executes Laravel's scheduled tasks. |
>> /dev/null 2>&1 | Suppresses standard output and error output. |
Step 3: Configure Cron Job in Hosting Control Panel
If you are using cPanel,:
- Log in to your hosting control panel.
- Navigate to Cron Jobs.
- Click Add New Cron Job.
- Select Once Per Minute as the execution frequency.
- Paste the cron command provided by the plugin.
- If your hosting panel separates the time fields from the command, enter only the command portion after the five asterisks.
- Save the cron job.
If you are using a VPS, configure the cron job using the server's crontab.
VPS configuration:
Open the terminal and execute:
bash
crontab -eAdd the following entry:
bash
* * * * * cd /www/wwwroot/your-domain.com && php artisan schedule:run >> /dev/null 2>&1Save and exit the editor.
Note: Ensure the cron job uses the correct PHP CLI executable and the correct application directory.
Step 4: Verify Cron Job Status
Return to:
Plugins → Auto Backup → Schedule
Check the Server cron job status.
Once the scheduled task is detected, the status should change to Running.
If the status remains Not set up, verify the cron expression, application directory and PHP executable.
7. Configure Automatic Backup Schedule
After configuring the server cron job, you can configure the automatic backup settings.
Navigate to:
Plugins → Auto Backup → Schedule
The Schedule section allows you to control when backups run and which data should be included.
Step 1: Enable Automatic Backups
Locate the Automatic backups option.
- Enable the Automatic backups toggle.
- Select how frequently backups should run.
- Configure the backup execution time.
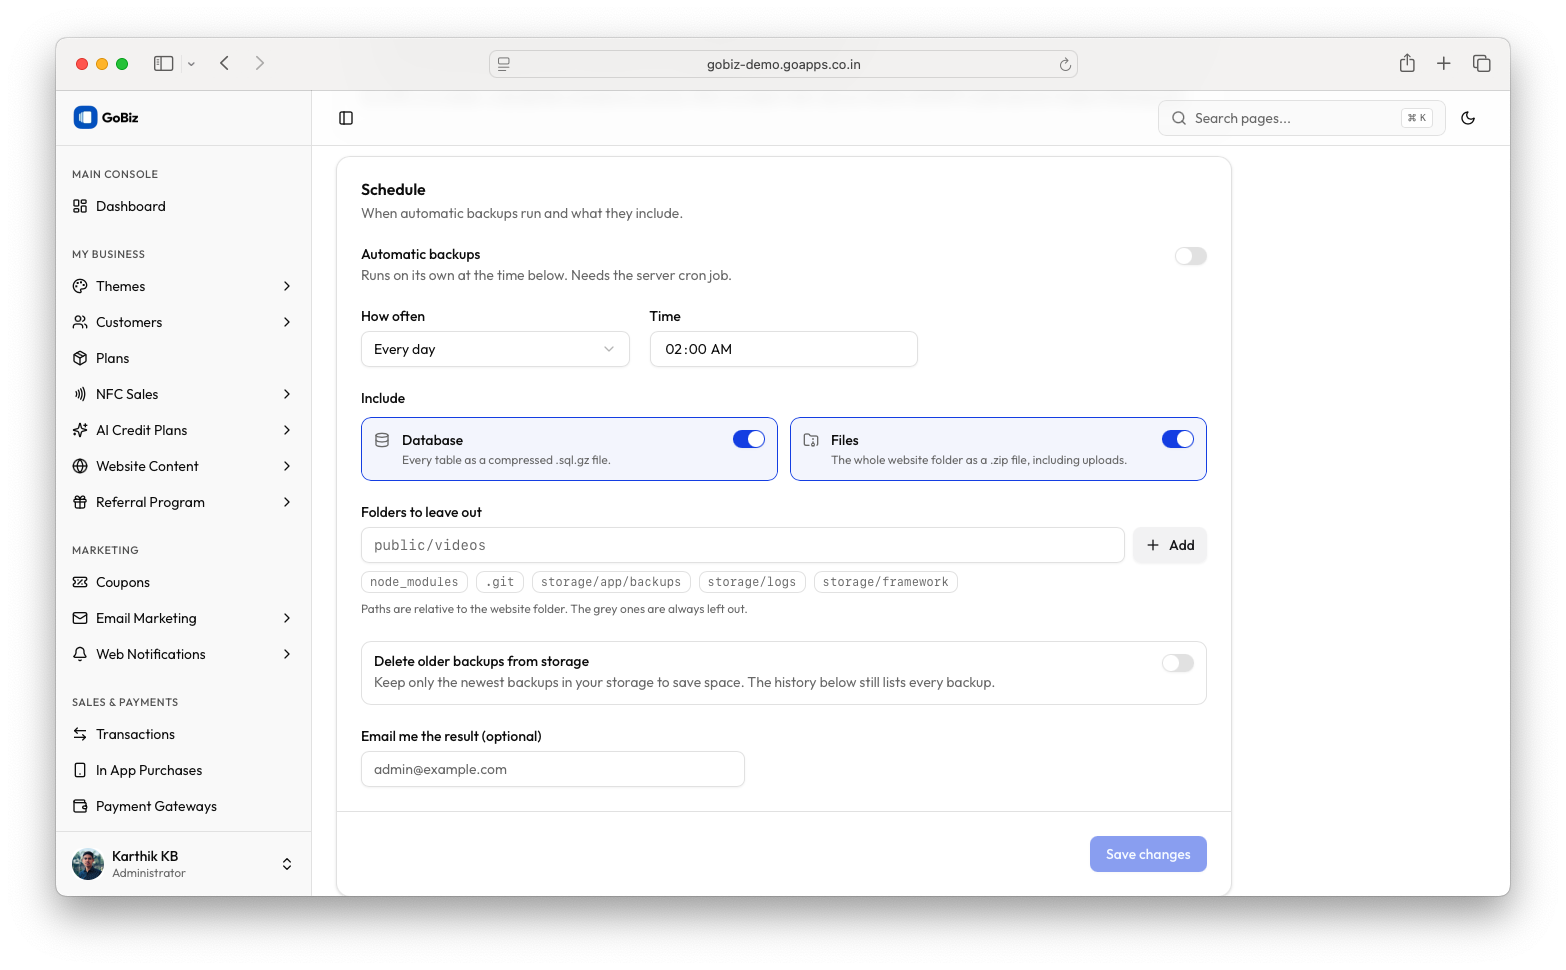
Available schedule configuration:
| Field | Description |
|---|---|
| Automatic backups | Enables or disables scheduled backups. |
| How often | Defines the backup frequency. |
| Time | Defines the time when the backup should run. |
Example:
- How often: Every day
- Time: 02:00 AM
With this configuration, backups will be scheduled to run every day at 02:00 AM.
Step 2: Select Backup Contents
The plugin allows you to select which data should be included in the backup.
Two backup options are available:
Database
- Includes the website database.
- Exports database tables into a compressed SQL file.
- Useful for restoring application data and database records.
Files
- Includes the website files.
- Generates a ZIP archive of the website folder.
- Includes uploaded files and other website assets, subject to configured exclusions.
Enable the options based on your backup requirements.
| Option | Description |
|---|---|
| Database | Includes the database in the backup. |
| Files | Includes the website files in the backup. |
Both options can be enabled to create a complete website backup.
Step 3: Configure Folders to Exclude
The plugin allows you to exclude specific folders from file backups.
This helps reduce backup size and prevents unnecessary files from being included.
- Locate the Folders to leave out field.
- Enter the folder paths you want to exclude.
- Click Add to add additional folder paths if required.
Example exclude folders:
text
public/videos
node_modules
.git
storage/app/backups
storage/logs
storage/framework
Important:
- Folder paths should be relative to the website root directory.
- The excluded folders will not be included in website file backups.
- Some system-generated exclusions may always remain excluded by the plugin.
Step 4: Configure Automatic Deletion of Old Backups
The plugin provides an option to delete older backups from connected storage providers.
- Locate Delete older backups from storage.
- Enable the option if you want to remove older backups automatically.
- Save the configuration.
When enabled, the plugin keeps only the newest backups in storage instead of retaining every backup indefinitely.
The backup history displayed in GoBiz will still list the backup records.
Step 5: Configure Email Notifications
The plugin allows you to provide an optional email address for backup result notifications.
- Locate the Email me the result (optional) field.
- Enter the email address where backup results should be sent.
- Verify the email address.
- Leave the field empty if you do not want to configure an email recipient.
Example:
Step 6: Save Backup Settings
After completing the configuration:
- Verify the automatic backup schedule.
- Verify the selected backup contents.
- Check the excluded folders.
- Review the old backup deletion setting.
- Verify the notification email address.
- Click Save changes.
Your automatic backup configuration will now be saved.
8. Verify Backup Configuration
After completing the configuration, verify that everything is working correctly.
Follow these steps:
- Confirm that at least one storage provider is connected.
- Verify that the storage provider connection is successful.
- Confirm that the server cron job status is Running.
- Enable automatic backups.
- Save the backup schedule.
- Open the Backups tab.
- Check the backup history after the scheduled execution.
Verify that the backup files are uploaded to the connected storage providers.
9. Additional Resources
For more information about external storage configuration, refer to the official documentation:
Google Drive
Dropbox
Microsoft OneDrive
Amazon S3 and Compatible Storage