
Appearance
Ticketing System Plugin – Configuration Guide
The Ticketing System Plugin allows administrators to manage customer support requests directly from the GoBiz Admin Panel. This guide explains how to configure each section of the Ticketing System Plugin.
1. Departments
The Departments section allows administrators to create and manage different support departments within the Ticketing System. When customers create a new support ticket, they can select the appropriate department based on their queries. This helps direct their requests to the right team members or AI Agents for assistance.
By default, the Ticketing System provides four departments:
- General: Handles general questions about customer accounts and other enquiries.
- NFC Cards: Handles NFC card orders, delivery, and activation-related enquiries.
- Technical: Handles technical problems related to vCards, stores, and the dashboard.
- Billing: Handles payment enquiries, invoices, subscription plans, and refunds.
Each department displays its name, description, ticket count, and management options. You can enable or disable a department, edit its details, delete it, or change its display order using the available controls.
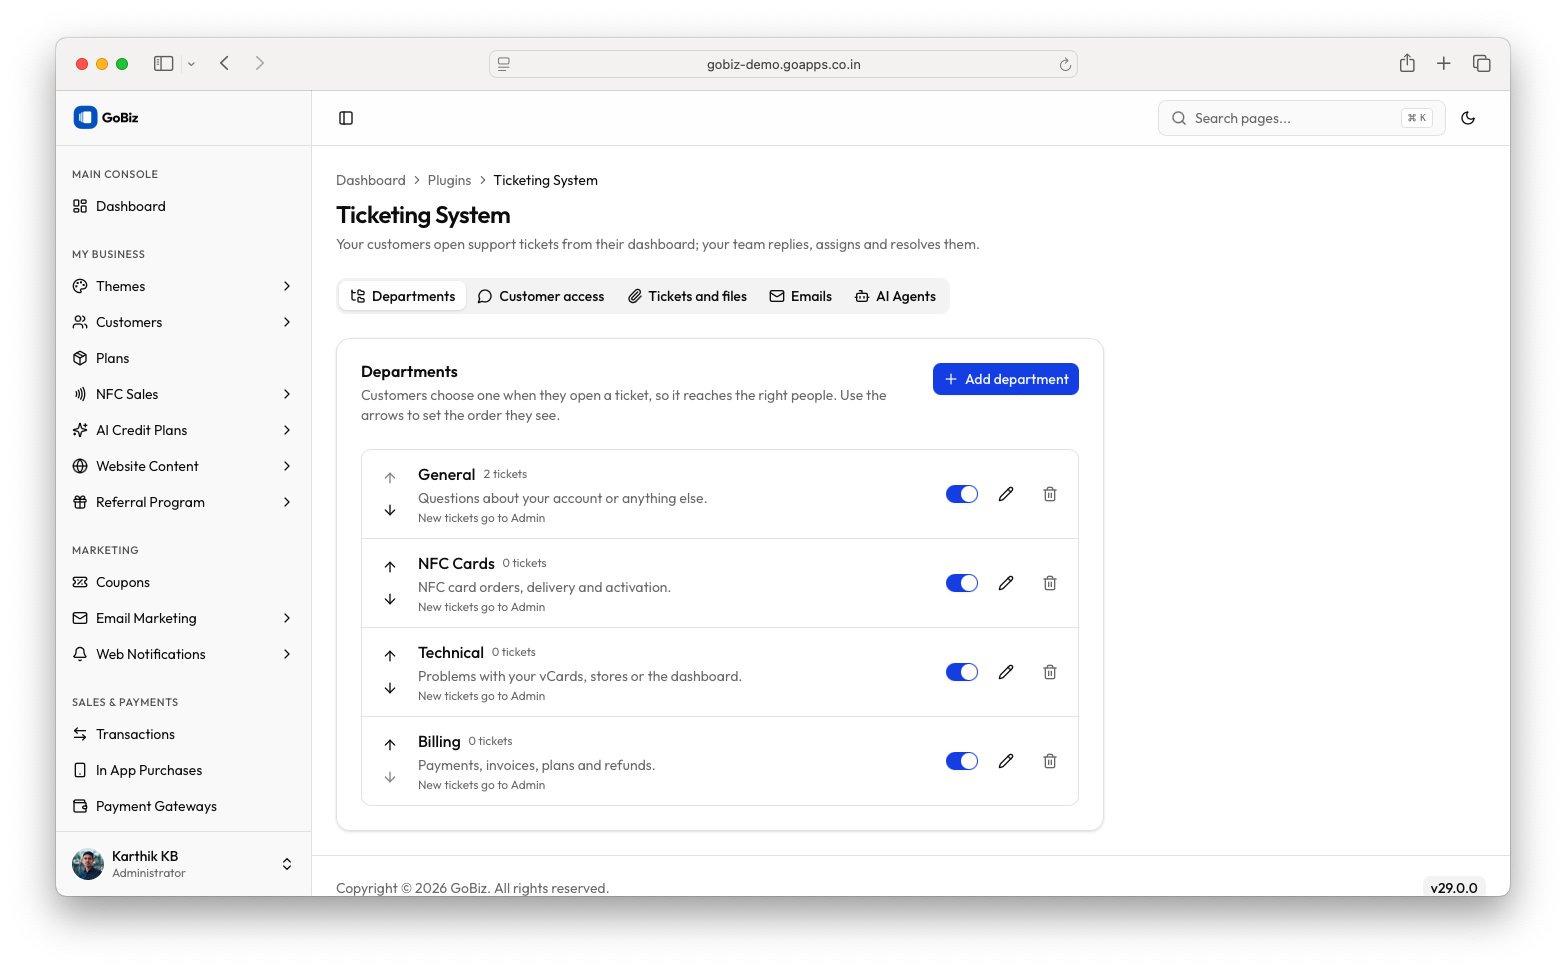
Add a New Department
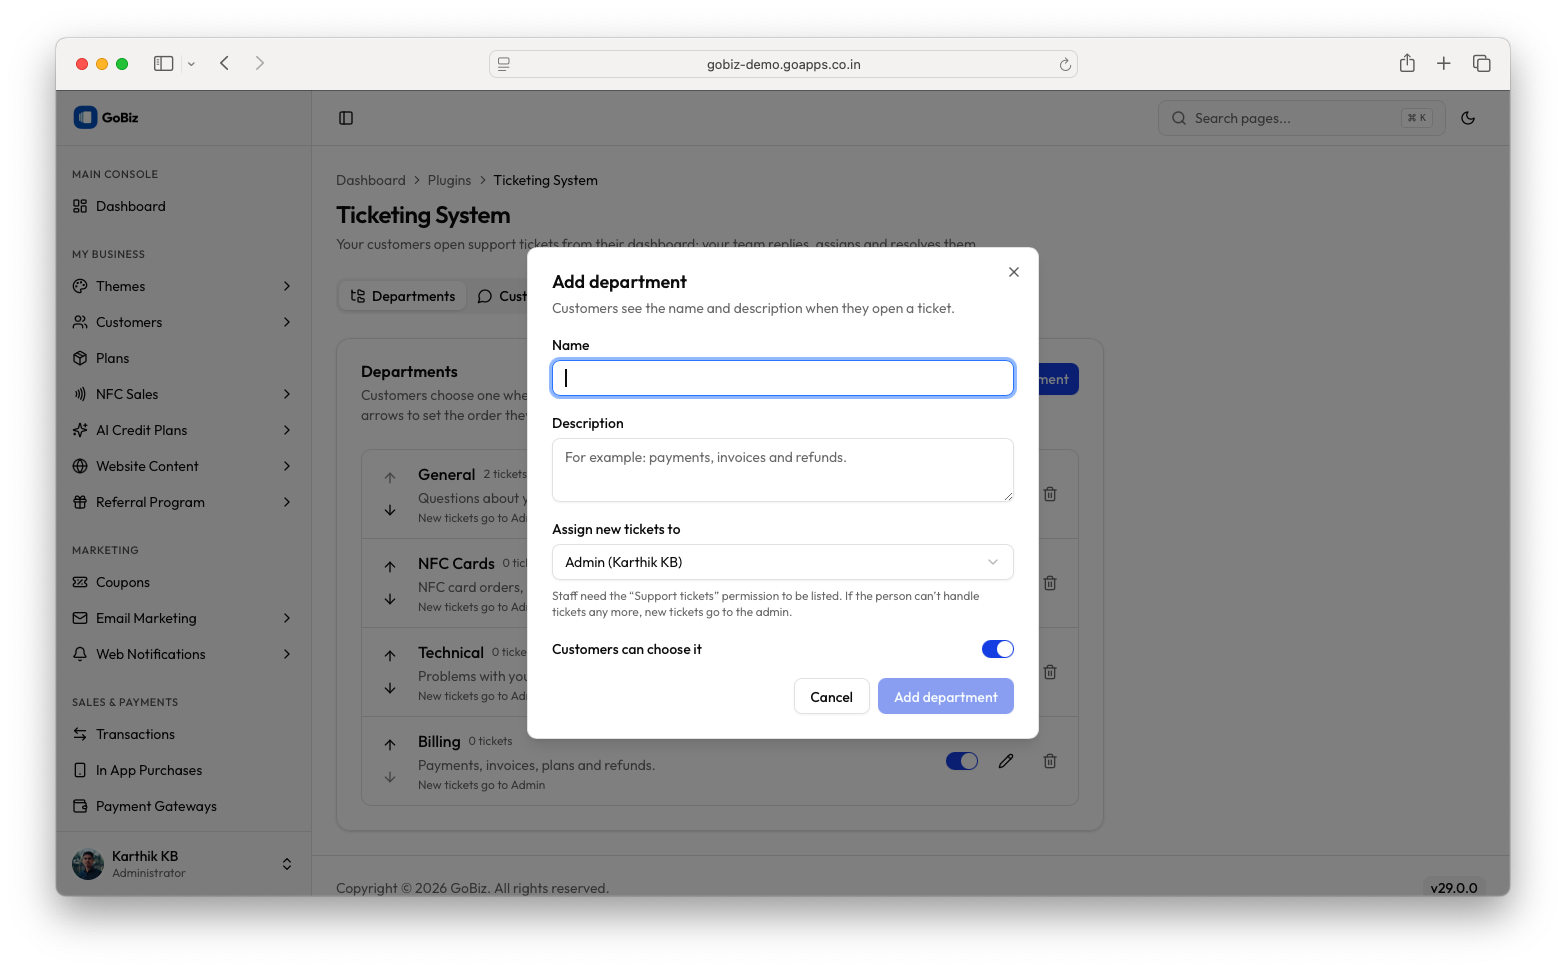
If you need to create an additional support department, navigate to the Departments section and click the Add department button. A configuration window will appear where you can provide the required department details.
Configure the following fields:
Name: Enter the name of the department you want to create. This name will be displayed to customers when they select a department while creating a support ticket.
Description: Enter a short description explaining the purpose of the department and the types of queries it handles. This helps customers identify the correct department for their requests.
Assign new tickets to: Select the team member or AI Agent responsible for handling newly created tickets under this department. You can assign tickets to an administrator or an available AI Agent, depending on your support requirements.
Customers can choose it: Enable this option to allow customers to select this department when creating a new support ticket. If disabled, customers will not be able to select this department directly.
After entering the required details and configuring the assignment options, click Add department to create the new department.
2. Customer Access
The Customer access section allows you to enable a support chat widget on your customers' dashboard pages. Once enabled, customers can access the support widget from their dashboard and request assistance without navigating to a separate support page.
Navigate to the Customer access tab to configure the chat widget.
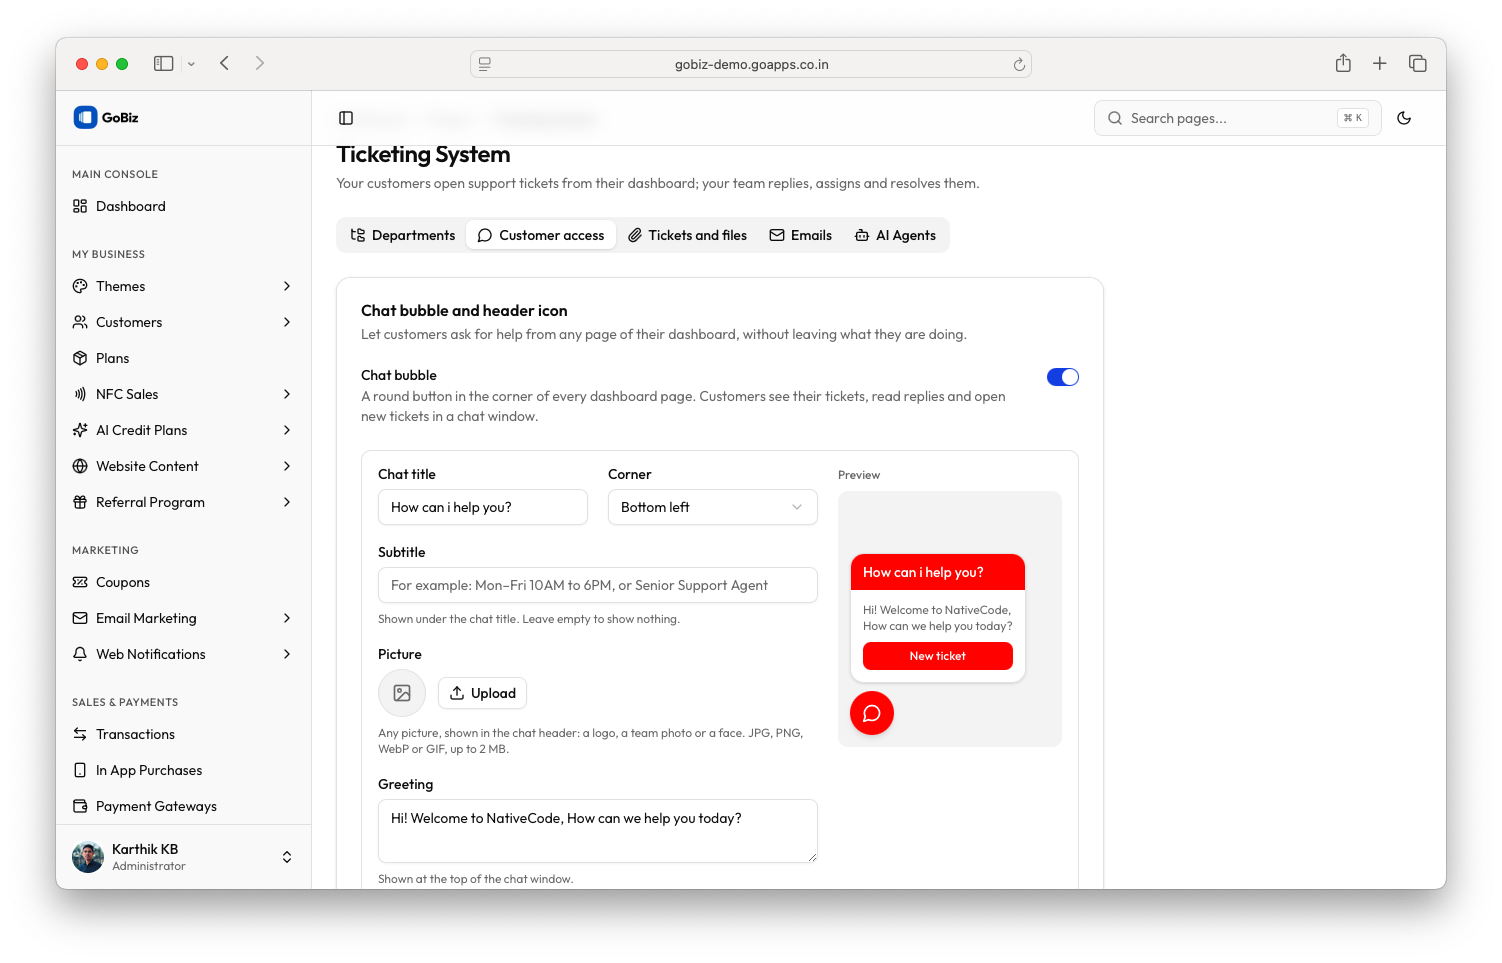
Enable Chat Bubble and Header Icon
Enable the Chat bubble and header icon option to display the support chat widget on customer dashboard pages. This allows customers to open the support interface, view their tickets, and request assistance whenever they need help.
Configure Chat Widget Appearance
The Customer access section provides several customization options to control how the support widget appears to customers.
Chat title: Enter the title you want to display at the top of the chat widget. For example, you can use "How can we help you?" to welcome customers.
Corner: Select where the chat widget should appear on the screen. You can choose either Bottom-left or Bottom-right, depending on your preferred placement.
Subtitle: Enter an optional subtitle to provide additional information about your support service. For example, you can mention your support availability or introduce your support team.
Picture: Upload an image to display in the chat header. You can use your company logo, support team image, or another suitable picture to represent your support service.
Greeting: Customize the greeting message displayed when customers open the chat widget. This message helps welcome customers and guides them on how to get assistance.
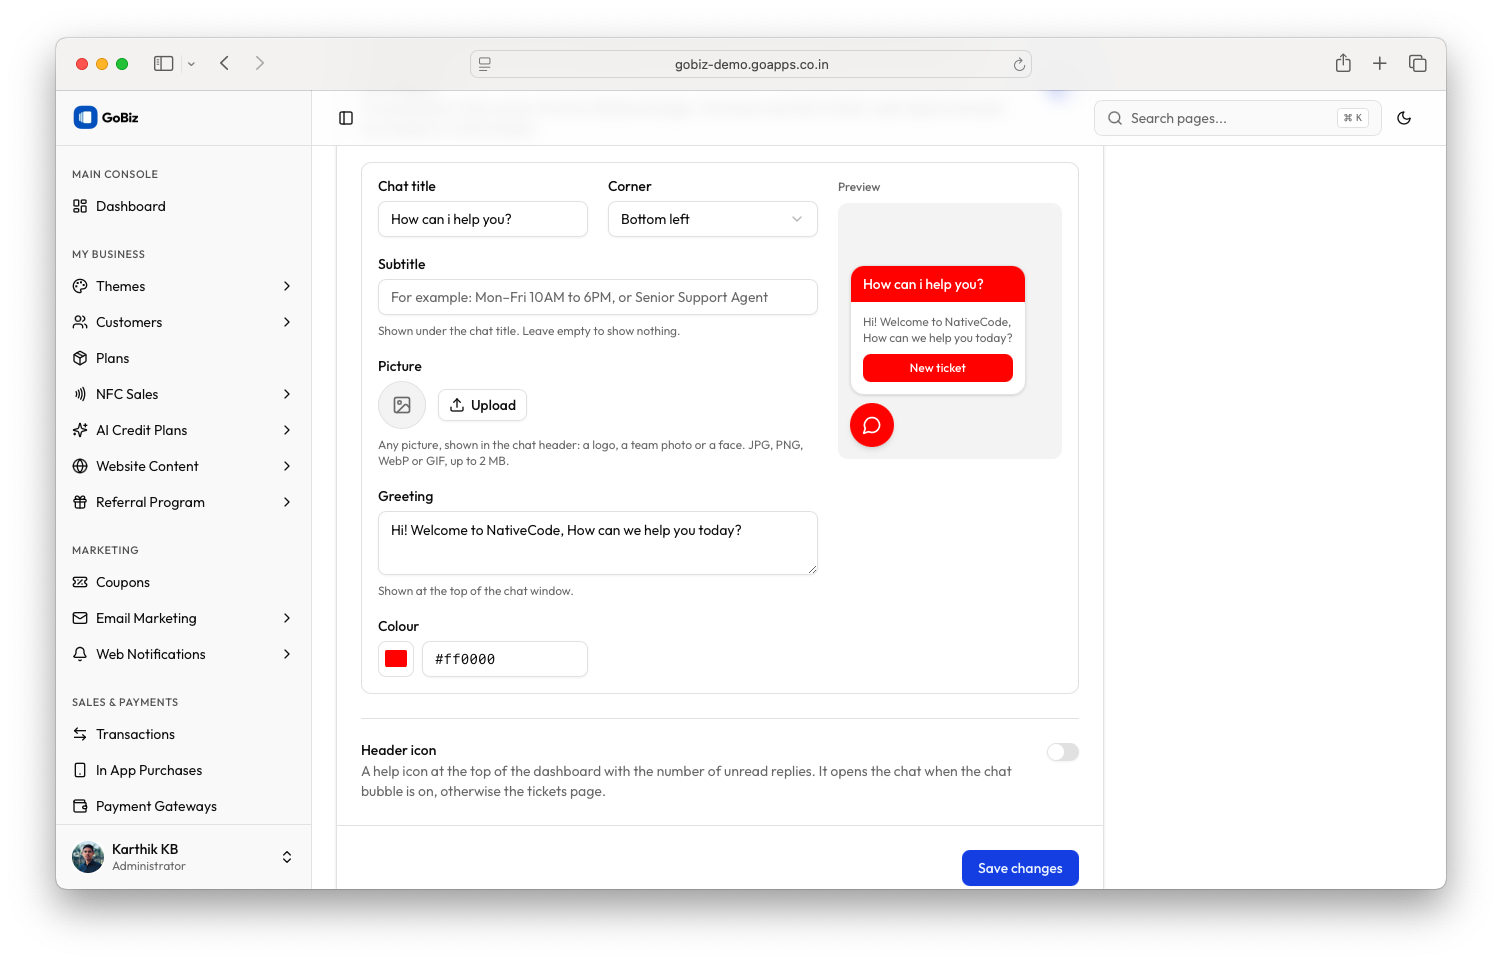
Colour: Choose the colour you want to use for the chat widget. You can select your preferred colour to match your website branding.
Preview and Save Changes
While editing the chat widget settings, the changes will be displayed immediately in the preview panel on the right side of the configuration page. Use this preview to verify the chat title, subtitle, picture, greeting, widget position, and colour before saving.
Once you have completed the customization, click Save changes to apply the configuration.
3. Tickets and Files
The Tickets and files section allows administrators to configure ticket numbering, ticket priorities, automatic ticket closure, customer reopening permissions, and file attachment restrictions.
Navigate to the Tickets and files tab to access these configuration options.
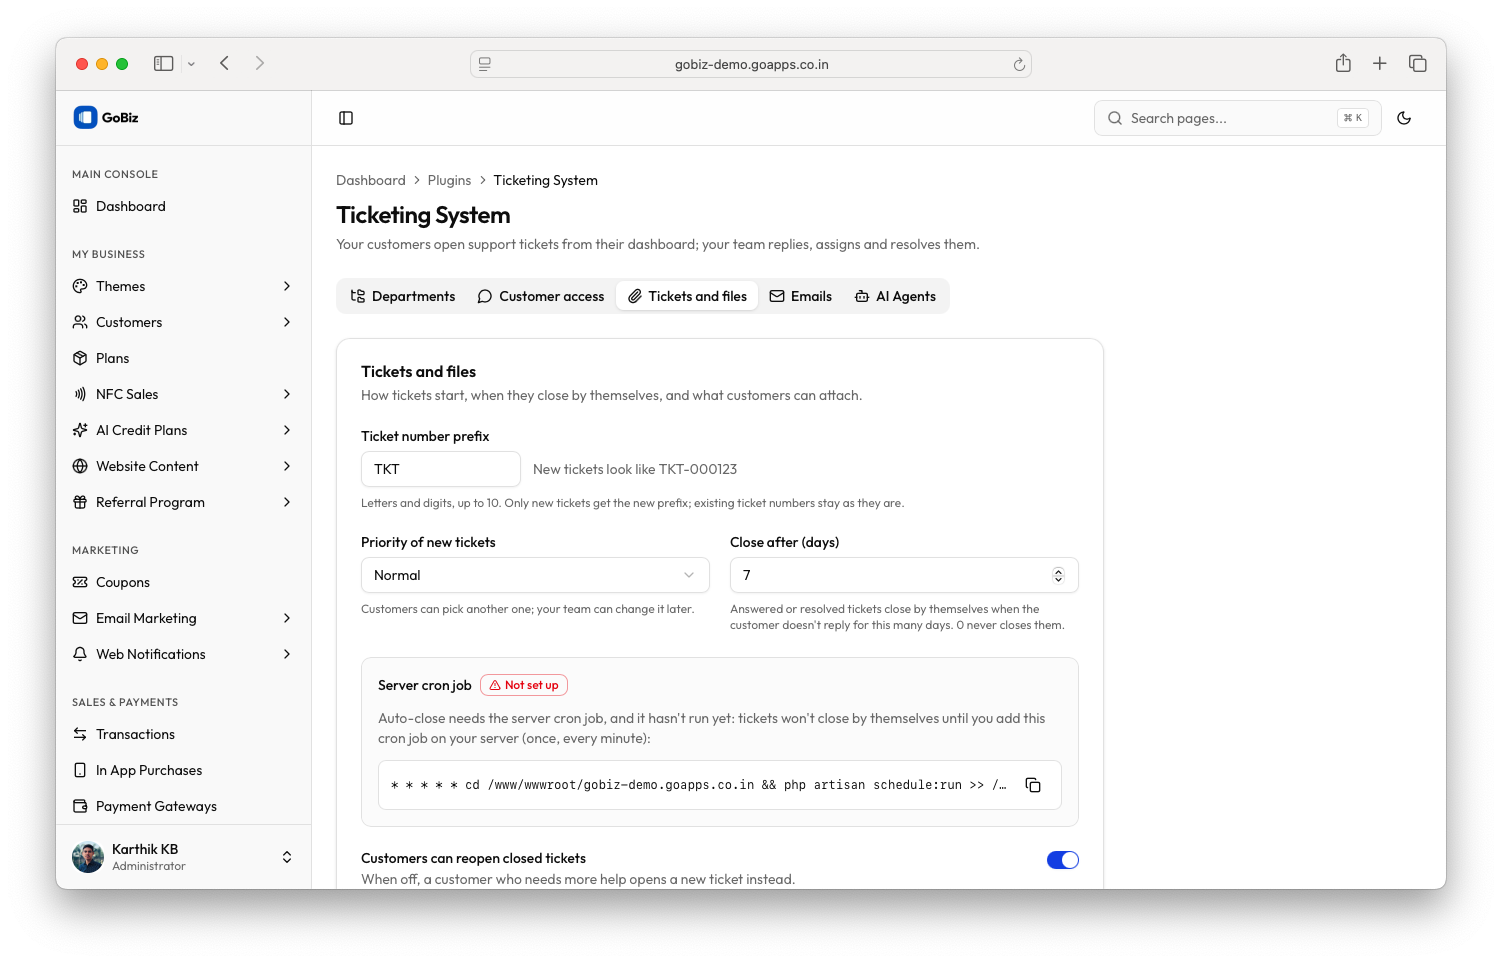
Ticket Number Prefix
The Ticket number prefix field allows you to define the prefix used for newly created support ticket numbers.
Enter your preferred prefix in the field. For example, if you use TKT as the prefix, newly created ticket numbers will follow that prefix.
This helps identify and organize support tickets using a consistent numbering format.
Priority of New Tickets
The Priority of new tickets option allows you to define the default priority assigned to newly created support tickets.
Select the appropriate priority from the available options. This determines the initial priority of a ticket when a customer submits a new support request.
Close After (Days)
The Close after (days) field allows you to configure the number of days after which a ticket will be automatically closed.
Enter the number of days you want the system to wait before closing tickets automatically. This helps maintain an organized ticket list by closing tickets that no longer require attention.
Server Cron Job
The Server cron job is required for automatic ticket closure to work.
The configuration page displays the cron command that needs to be added to your server's cron job configuration. Copy the command provided in the Ticketing System settings and configure it in your server's cron job manager.
If the server cron job is not configured or is not running correctly, automatic ticket closure will not work. Tickets will remain open until they are manually closed or the required cron job is configured and executed successfully.
Customers Can Reopen Closed Tickets
Enable Customers can reopen closed tickets to allow customers to reopen previously closed support tickets when they need additional assistance.
When this option is disabled, customers cannot reopen closed tickets. If they require further assistance, they must create a new support ticket.
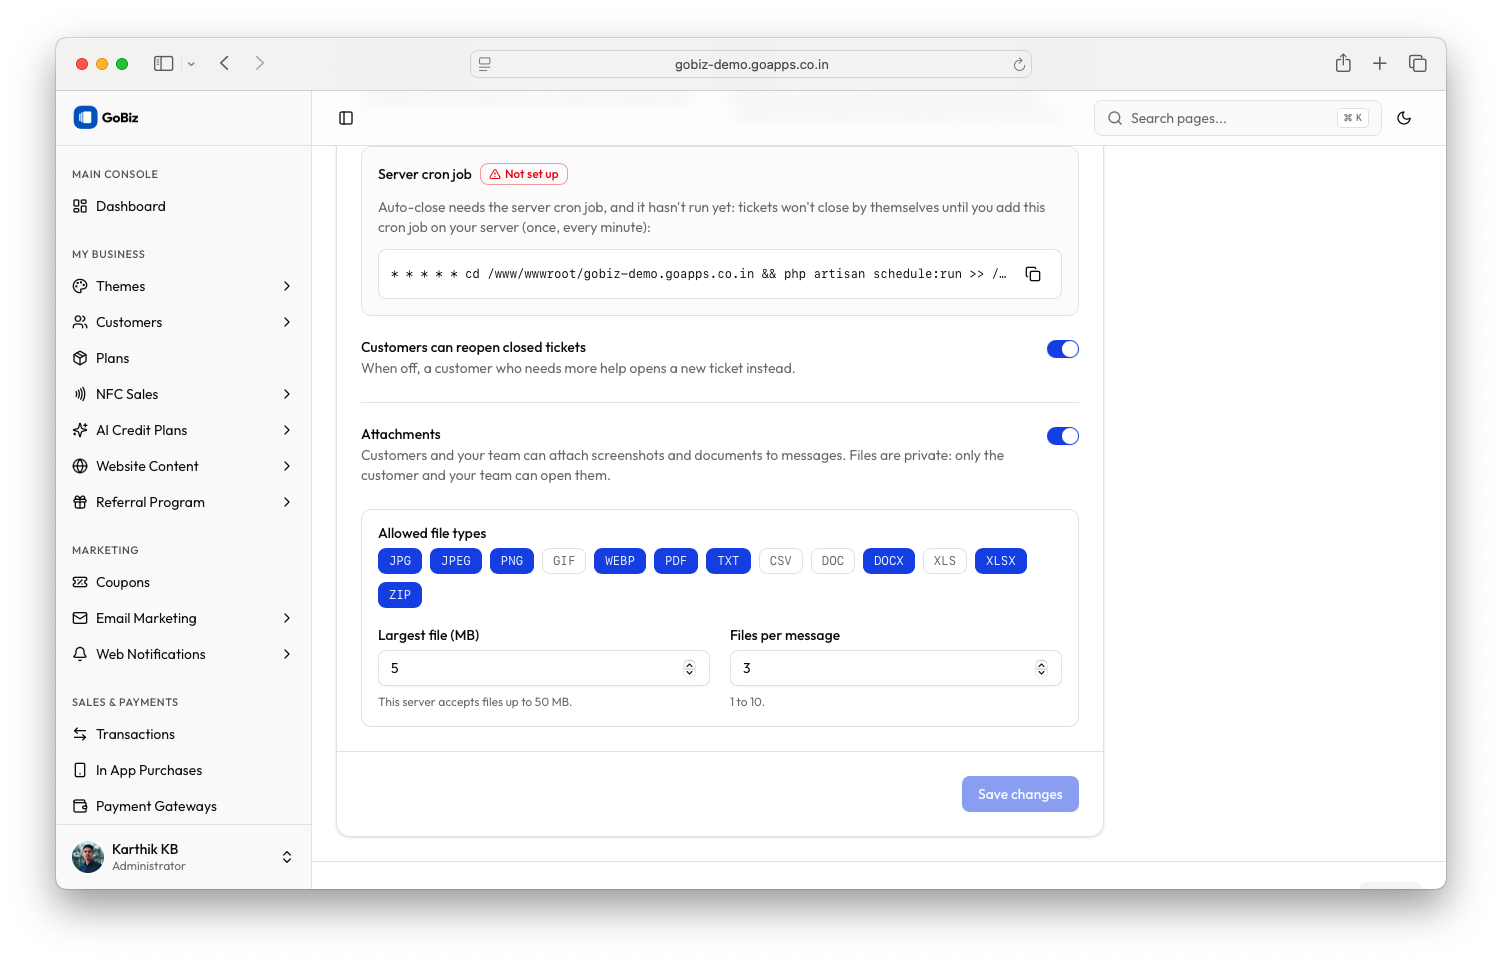
Attachments
The Attachments section allows you to control the files customers can upload while communicating through support tickets.
Enable the attachment option to allow customers to upload screenshots and documents along with their support messages.
Configure the following options:
Allowed file types: Select the file formats customers are permitted to upload. You can enable or disable the available file types according to your requirements.
Largest file (MB): Set the maximum file size allowed for an individual attachment. This determines how large a file a customer can upload.
Files per message: Specify the maximum number of files a customer can attach to a single message.
These settings help control the file formats, individual file size, and number of attachments permitted in support conversations.
Once you have configured the ticket and attachment settings, click Save changes to apply the configuration.
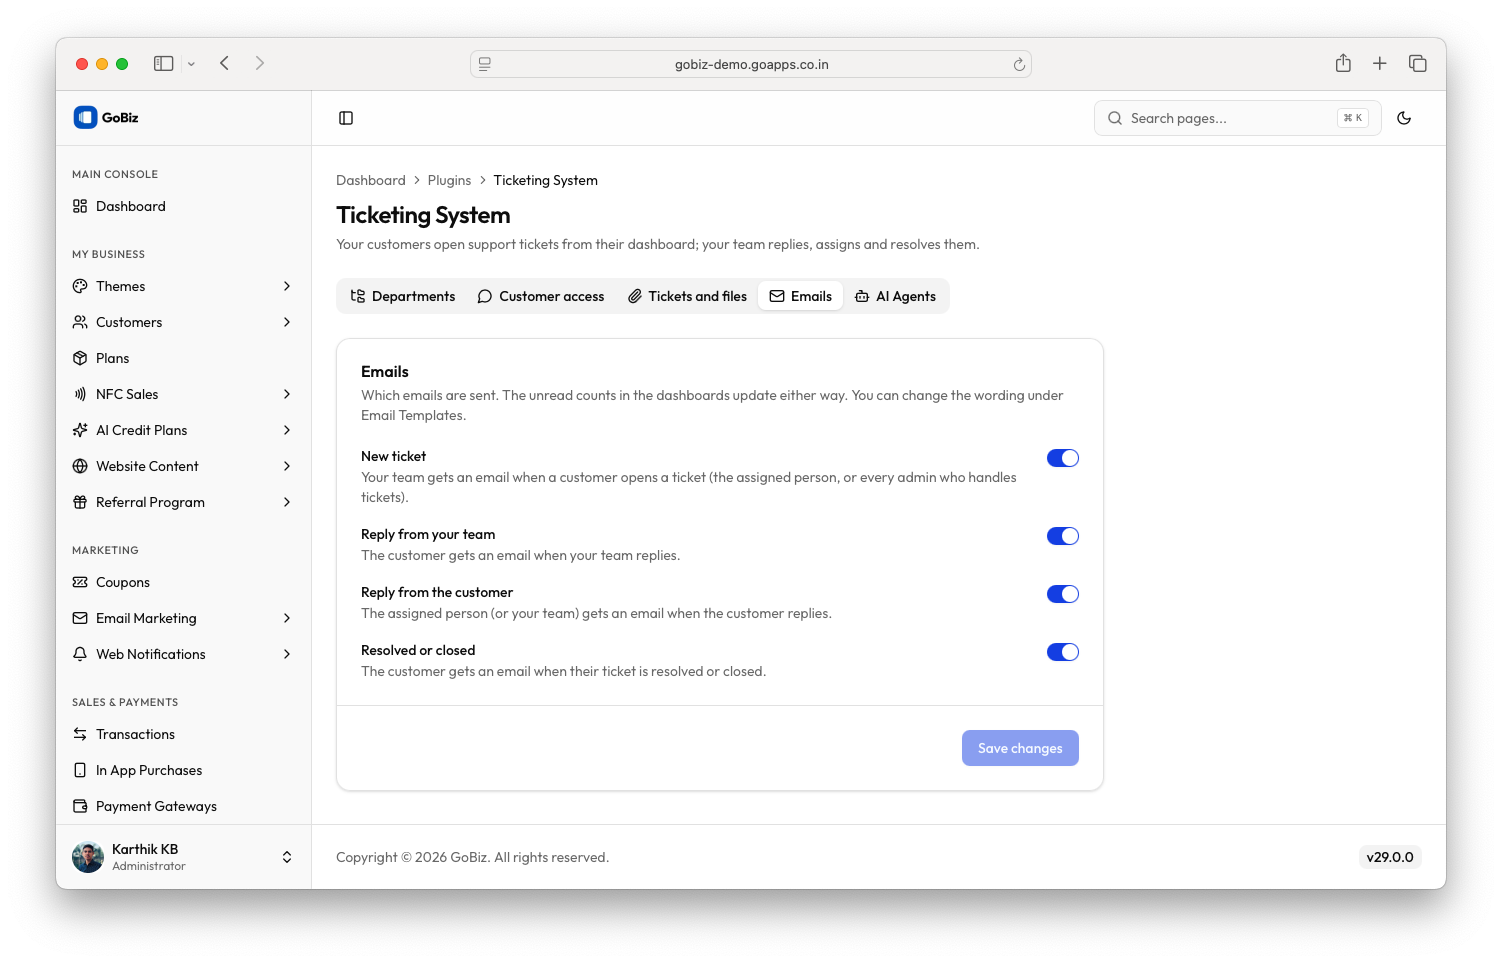
4. Emails
The Emails section allows you to control automatic email notifications sent to customers and team members when important ticket-related activities occur.
Navigate to the Emails tab to view the available notification settings.
The following email notifications can be enabled or disabled individually:
New ticket: Enable this option to send an automatic email notification to the customer when a new support ticket is created.
Reply from your team: Enable this option to notify the customer by email whenever a team member replies to their support ticket.
Reply from the customer: Enable this option to send an email notification to the assigned team member when the customer replies to an existing ticket.
Resolved or closed: Enable this option to notify the customer by email when their support ticket is resolved or closed.
Use the available toggle buttons to enable or disable each notification based on your communication requirements.
Once you have configured the email notification preferences, click Save changes to apply the settings.
5. AI Agents
The AI Agents section allows you to configure AI-powered customer assistance and create AI Agents that can handle support tickets based on the instructions and reference files provided to them.
This section contains two main configurations: AI Assistant and Agents.
AI Assistant
The AI Assistant allows customers to ask questions about your platform and receive automated responses without creating a support ticket.
Customers can use the Ask AI feature to understand your platform, find information, and resolve simple questions. If the AI Assistant cannot resolve a customer's query, it can offer the option to convert the conversation into a support ticket.
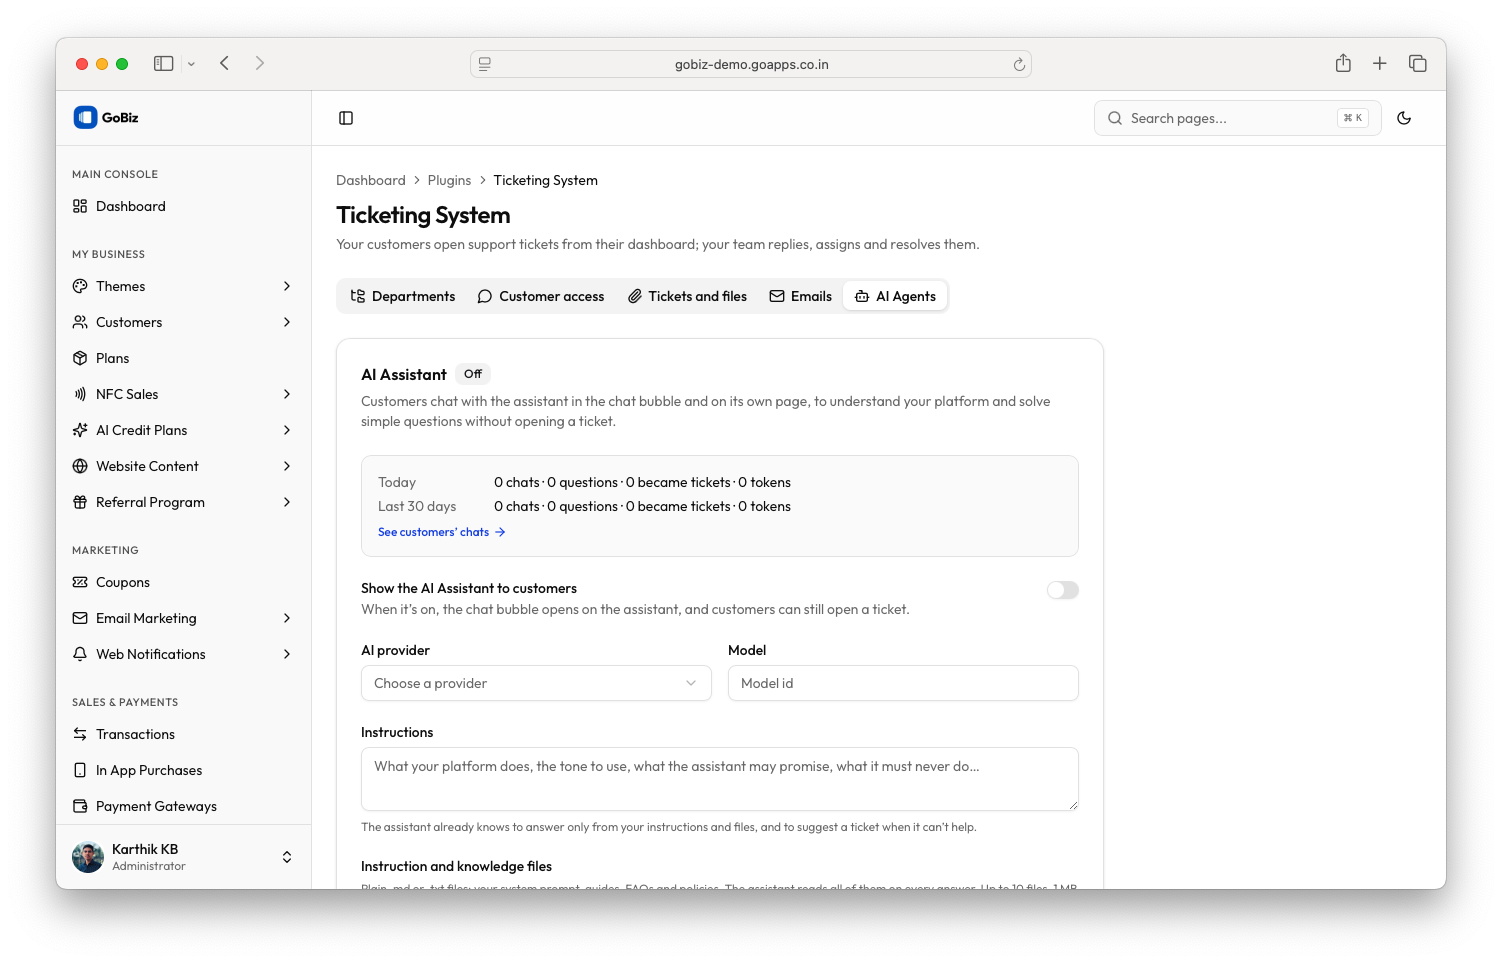
Show the AI Assistant to customers: Enable this option to make the AI Assistant available in the customer chat widget.
When this option is disabled, customers will see the regular support chat interface and can create support tickets directly.
When enabled, customers can interact with the AI Assistant and ask questions before creating a support ticket. If the assistant cannot resolve their issue, customers can use the available option to continue the conversation by creating a support ticket.
AI provider: Select the AI provider you want to use from the dropdown menu.
Model: Enter the model identifier corresponding to the selected AI provider. For example, if you are using OpenAI, select OpenAI as the provider and enter o4-mini as the model ID.
Instructions: Provide clear instructions about your platform and how the AI Assistant should respond to customer queries. Explain what your platform does, what information the assistant can provide, what it can promise, what it must never do, and what tone it should use when communicating with customers.
The assistant should also be instructed on how to handle questions it cannot answer and when to suggest creating a support ticket.
The assistant uses the instructions and uploaded reference files as its knowledge sources. Make sure the instructions clearly define its responsibilities and limitations.
Instruction and Knowledge Files
The Instruction and knowledge files section allows you to upload reference documents that help the AI Assistant understand your platform and answer customer questions.
Click Add files and select the relevant documents from your computer.
You can upload documents such as:
- Frequently Asked Questions (FAQs).
- Platform user guides and documentation.
- Product information and feature descriptions.
- Company policies and support guidelines.
- Troubleshooting instructions.
- Subscription and billing information.
These documents provide additional information that the AI Assistant can use when responding to customer queries.
The assistant's responses are based on the instructions and reference files you provide. Make sure the uploaded documents contain accurate and relevant information.
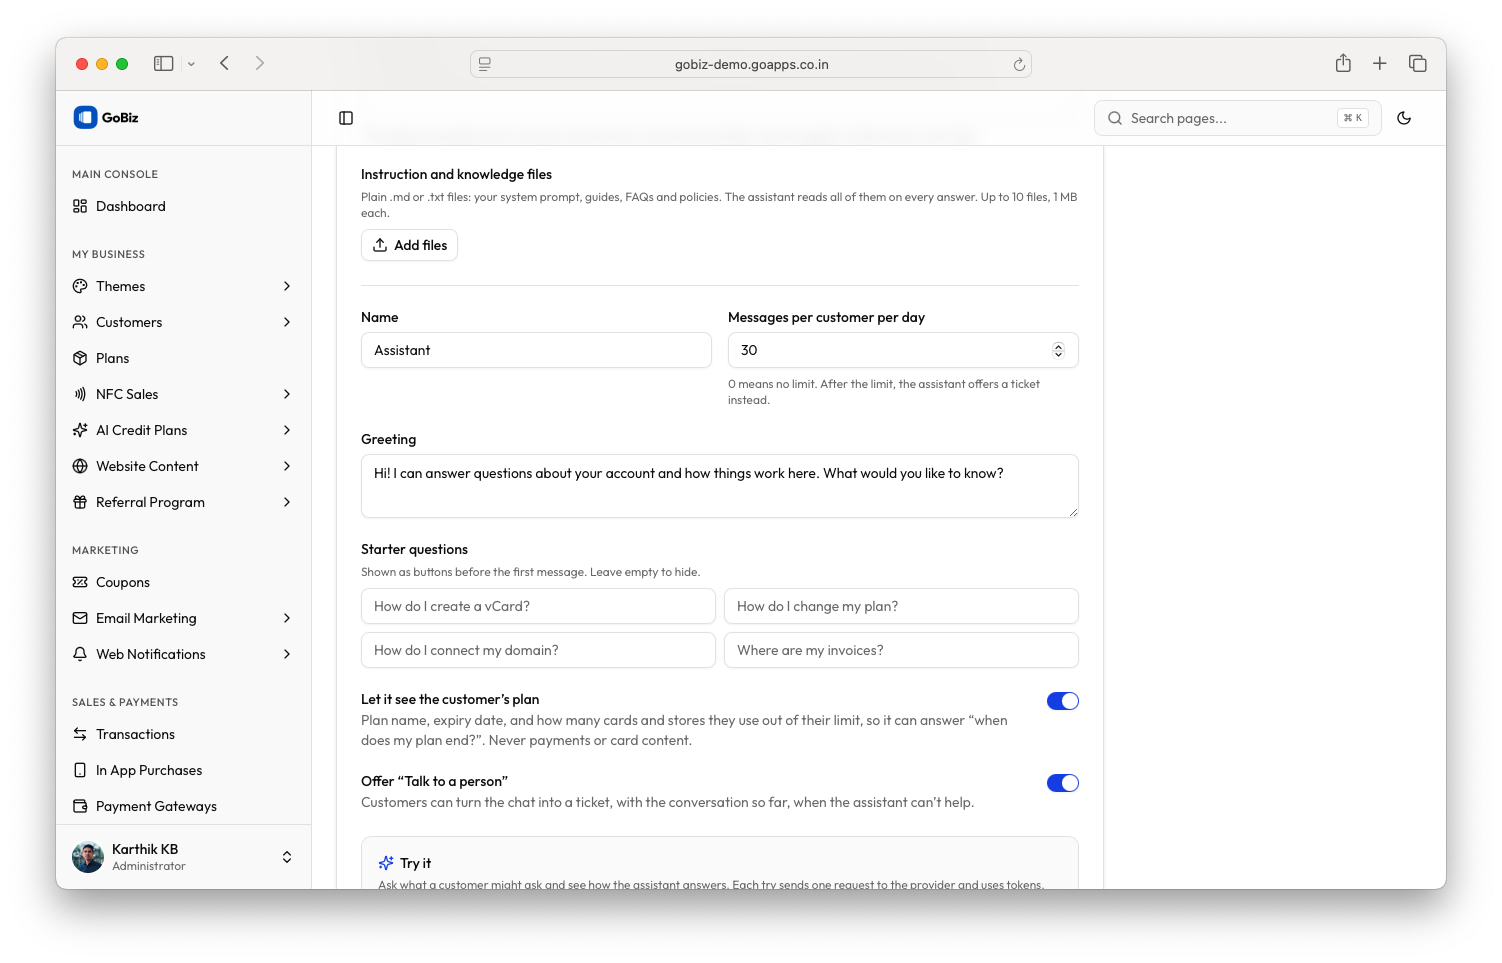
Assistant Name and Message Limit
Name: Enter the name you want to display for your AI Assistant. For example, you can use Assistant, Support Assistant, or your preferred assistant name.
Messages per customer per day: Set the maximum number of messages each customer can send to the AI Assistant per day. Once the configured limit is reached, the assistant will offer the customer the option to create a support ticket instead.
Greeting and Starter Questions
Greeting: Customize the first message displayed when customers start interacting with the AI Assistant. Enter a greeting that welcomes customers and explains how the assistant can help them.
For example:
"Hi! I can answer questions about your account and explain how things work here. What would you like to know?"
Starter questions: Add suggested questions that customers can select before sending their first message. These questions appear as buttons in the chat interface and help customers quickly start a conversation.
For example:
- How do I create a vCard?
- How do I change my plan?
- How do I connect my domain?
- Where are my invoices?
Additional Assistant Options
Use the customer's plan: Enable this option to allow the AI Assistant to use the customer's plan information when responding to queries. This helps the assistant provide answers based on the customer's subscription plan and available features.
Offer "Talk to person": Enable this option to allow customers to switch from AI assistance to human support. When the assistant cannot resolve a customer's query, the customer can use this option to create a support ticket and continue the conversation with your support team.
Once you have configured the AI provider, instructions, knowledge files, greeting, starter questions, and other preferences, proceed to configure the AI Agents.
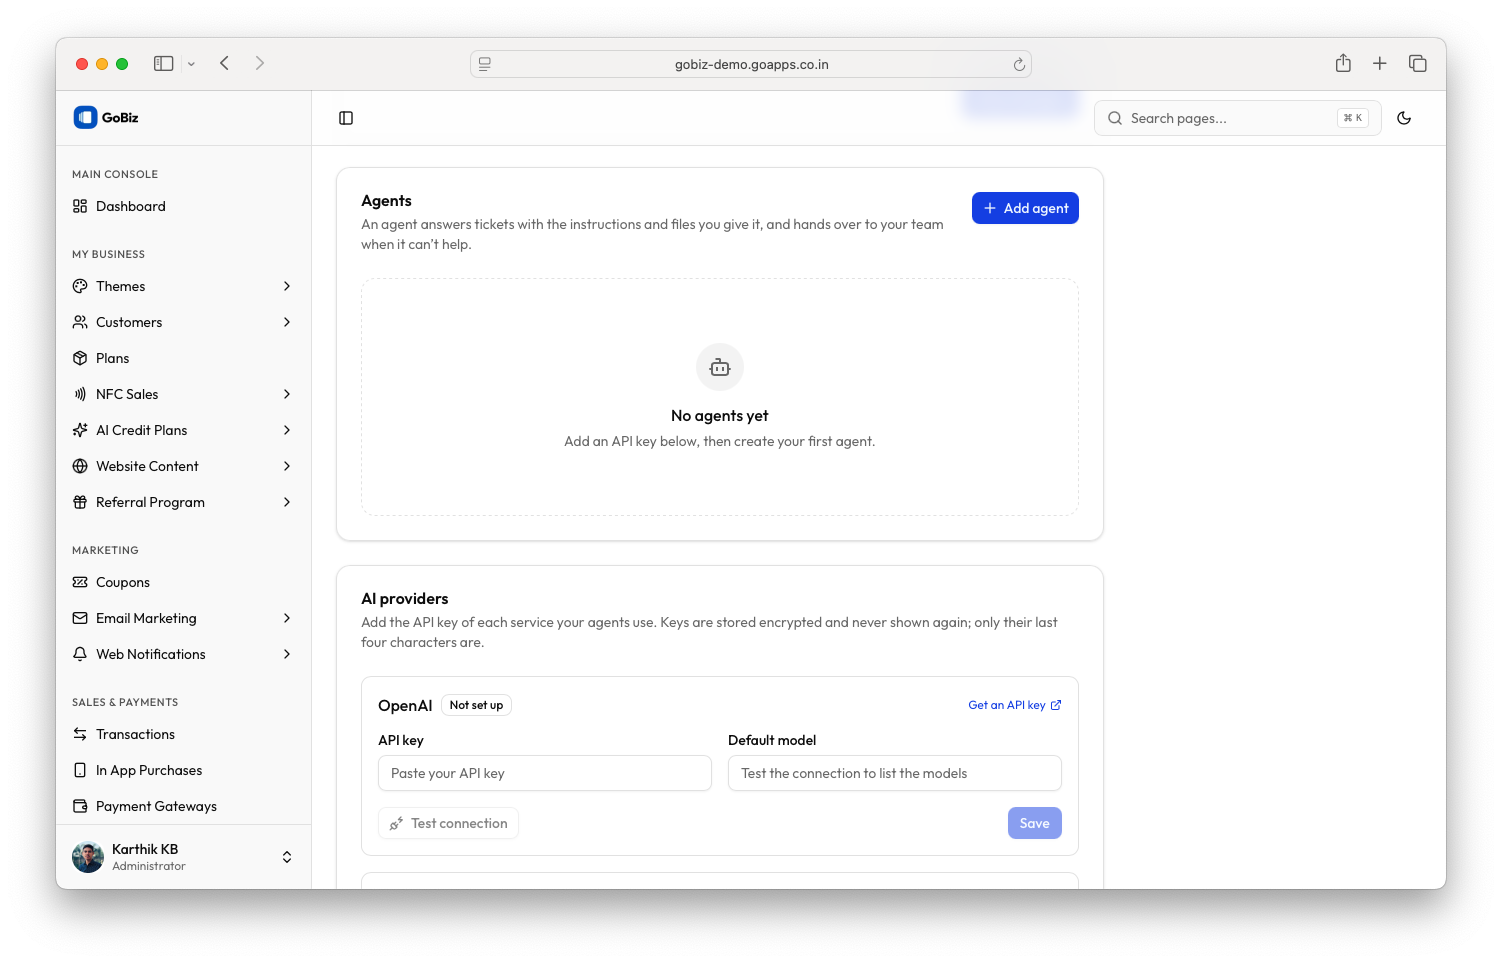
Agents
The Agents section allows you to create AI-powered agents that can handle support tickets based on the instructions and reference files provided to them.
An AI Agent can understand customer queries, prepare responses, and assist with ticket management. You can assign agents to departments so that newly created tickets are directed to the appropriate agent.
If an agent cannot resolve a customer's issue, it can hand over the conversation to your support team.
Add a New AI Agent
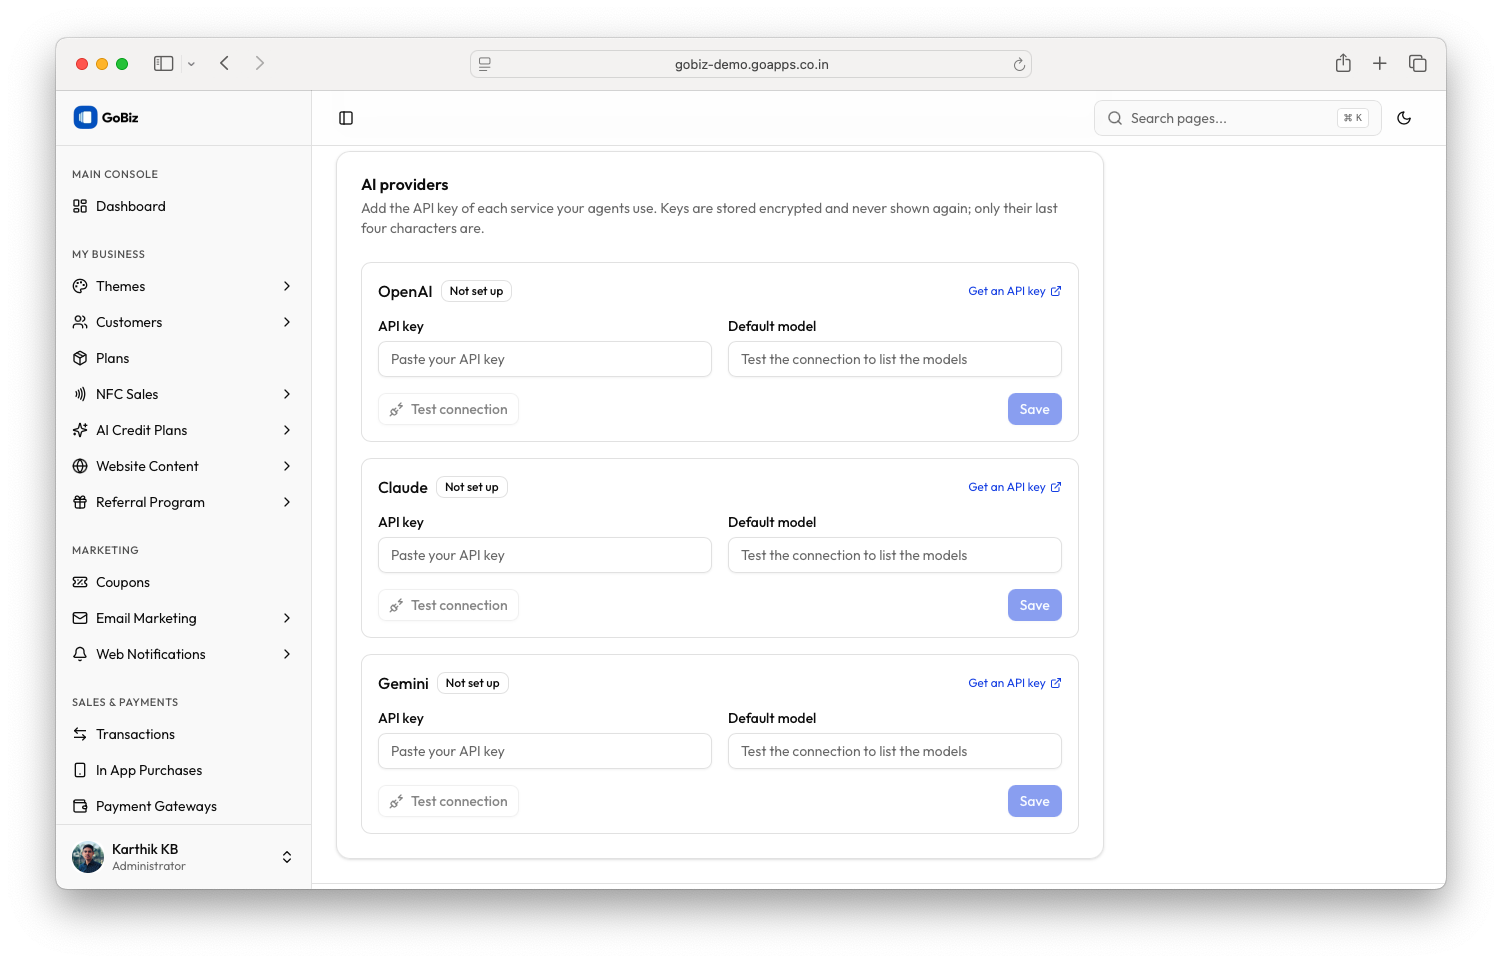
To create a new AI Agent, navigate to the Agents section and click the Add agent button. A configuration window will appear where you can provide the agent's details.
Configure the following fields:
Name: Enter the name of the AI Agent. This name identifies the agent when assigning it to departments or support tickets.
AI provider: Select the AI provider that you want the agent to use. Choose the provider that has been configured in the AI provider settings.
Model: Enter the model identifier corresponding to the selected AI provider.
Instructions: Provide clear instructions explaining how the AI Agent should handle customer support requests.
Your instructions should explain how the agent should understand and respond to customer queries, how it should use uploaded reference files, how it should handle requests to close or resolve tickets, and when it should hand over a ticket to a team member.
For example, instruct the agent to answer customer questions using the provided reference documents, assist with relevant support requests, and hand over tickets to the support team whenever it cannot provide a reliable solution.
Reference files: Click Add files to upload documents that the AI Agent should use when responding to customer queries. You can provide FAQs, product guides, policies, troubleshooting documents, and other relevant reference materials.
The uploaded reference files help the agent understand your platform and provide answers based on the information you supply. The file upload limit is up to 10 MB, as indicated in the configuration interface.
Reply to customer on its own: Enable this option to allow the AI Agent to send responses directly to customers.
When this option is disabled, the agent can prepare or draft responses, but a team member must review and send the message to the customer.
Agent on: Enable this option to activate the AI Agent. When disabled, the agent will not respond to tickets even if it is assigned to a department.
After configuring the required fields, review the agent settings before saving the configuration.
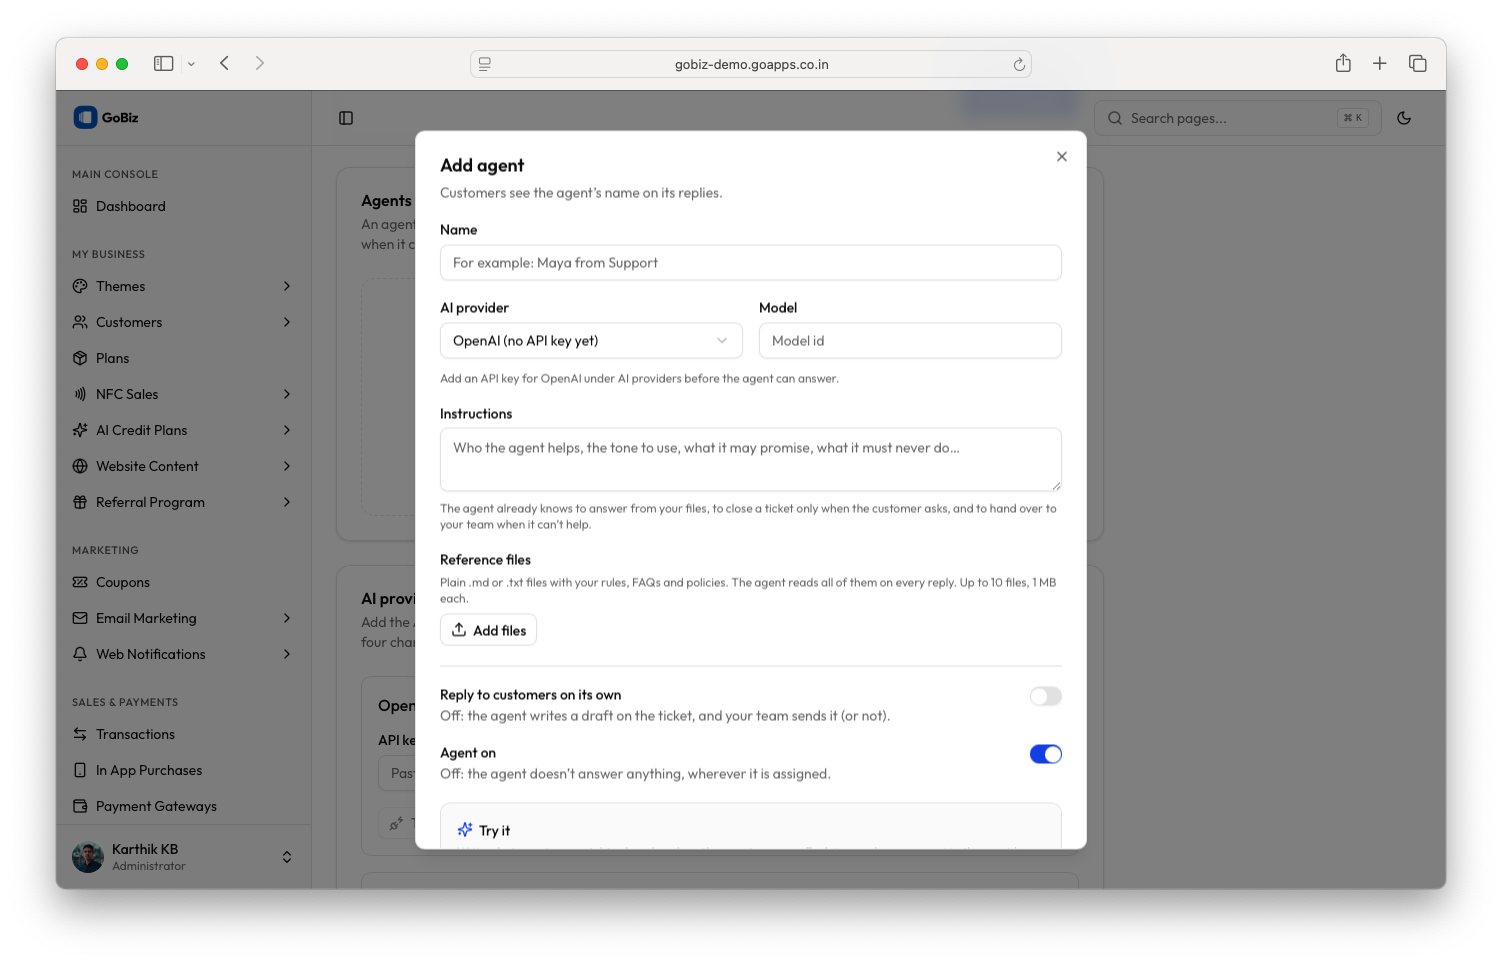
Configure AI Provider API Credentials
Before using the AI Assistant or AI Agents, you must configure the API credentials for the selected AI provider.
The AI providers section allows you to connect supported AI services by providing their API keys and default model identifiers.
The available provider options shown in the configuration interface include:
- OpenAI
- Claude
- Gemini
Select the appropriate provider and enter the required credentials.
API key: Paste the API key obtained from your selected AI provider into the API key field.
Default model: Enter the model identifier you want to use as the default model for the selected provider.
For example, when configuring OpenAI, enter your OpenAI API key and use o4-mini as the default model identifier.
After entering the API key and default model, click Save to store the provider configuration. Use the Test connection option to verify that the provider connection is working correctly.
Repeat this configuration for any additional AI providers you intend to use.
Important: The AI Assistant and AI Agents require a valid API key and a configured model from the selected provider to function correctly.
Assign AI Agents to Departments
After creating and activating an AI Agent, you can assign it to a support department.
Navigate back to the Departments section and open the department you want to configure. Under Assign new tickets to, select the required AI Agent instead of assigning the tickets to a team member.
When a customer creates a new ticket under that department, the ticket can be assigned to the selected AI Agent according to the department configuration.
You can assign different agents to different departments based on their responsibilities and the types of customer queries they handle.
Make sure the assigned AI Agent is enabled and its AI provider is configured correctly.
Save AI Agent Configuration
After completing the AI Agent configuration, verify the agent name, AI provider, model, instructions, reference files, and activation status.
Make sure the Agent on option is enabled if you want the agent to handle assigned tickets.
Once everything is configured, click Save to apply the settings.